Menus, hotspots, task management, skinnable taskbars, system tray control, themes, and internal commands for the Windows desktop.
1. Introduction
This guide explains NextSTART, the menu, hotspot and task management component of Winstep Xtreme. NextSTART can replace or complement the standard Windows taskbar and Start Menu with user-skinnable menus, configurable hotspots, a flexible taskbar container, a tasklist, a system tray, a tray clock, WorkShelf module capture, themes, sounds, and internal commands.
1.1 What is Winstep Xtreme?
Winstep Xtreme is a suite of Windows shell enhancements designed to extend the standard Explorer desktop while giving the user far more control over launching applications, organizing workspaces, managing running tasks, and customizing the look and behavior of the desktop.
WorkShelf and NextSTART are the two main interactive components of Winstep Xtreme. WorkShelf is centered on docks, shelves, drawers, Grid Stacks, Launch Pads, modules, and desktop organization. NextSTART is centered on menus, hotspots, task management, and a skinnable taskbar environment.
1.2 What is NextSTART?
NextSTART is a powerful menu and taskbar system for Windows. It can display customized menus, replace or supplement the Windows taskbar, manage running applications, display or detach the system tray and tasklist, and run commands through hotspots, buttons, menus, and keyboard shortcuts.
The three pillars of NextSTART
NextSTART is best understood as three connected systems: Menus, Hotspots, and Task Management. Menus are the command surface. Hotspots are the activation methods. Task Management controls running windows, task buttons, the system tray, the tray clock, Quick Launch items, WorkShelf modules, and the optional taskbar container that holds them.
1.3 How NextSTART and WorkShelf work together
NextSTART and WorkShelf are separate applications, but under Winstep Xtreme they cooperate closely. Some settings, such as the current theme, are synchronized between both components unless that behavior is disabled. WorkShelf desktop modules can be captured into the NextSTART taskbar, where they appear in iconic form. NextSTART menus, hotspots, and taskbar items can activate WorkShelf objects such as Docks, Grid Stacks, and Launch Pads.
NextSTART also provides the menu theme used by WorkShelf right-click context menus under Winstep Xtreme. This means a full Winstep theme can make menus, taskbars, docks, shelves, modules, and context menus feel like parts of one desktop environment.
1.4 The Winstep product family
Winstep Xtreme is the full suite and includes NextSTART, WorkShelf, Start Menu Organizer Pro, and FontBrowser. Nexus and Nexus Ultimate are
simpler dock-focused products derived from the WorkShelf side of the environment. NextSTART is not a derivative of WorkShelf: it is the menu, hotspot, and task management half of Winstep Xtreme.
2. Core NextSTART concepts
2.1 Menus
If docks are the center of WorkShelf, menus are the center of NextSTART. A NextSTART menu is not just a simple list of shortcuts: it is a skinnable, configurable, keyboard-aware, drag-and-drop command surface. Menus can launch programs, open documents, browse folders, display submenus, run internal commands, apply themes, activate WorkShelf objects, and expose system locations.
Menus can be created and edited by drag and drop or through the built-in Menu Editor. They can be opened from hotspots, taskbar buttons, Quick Launch items, desktop buttons, screen-edge bumps, keyboard hotkeys, and other activation methods.
2.2 Hotspots
A hotspot is an activation method associated with an action. Hotspots can be screen-edge or screen-corner bumps, buttons on the desktop, buttons on the NextSTART taskbar, Start Button actions, Quick Launch items, keyboard shortcuts, or, in advanced setups, regions allocated inside other application windows.
The action assigned to a hotspot can display a menu, run a program, open a document or folder, execute an internal command, apply a theme, show a WorkShelf object, or perform another supported action.
2.3 Task Management
NextSTART can manage running applications through its own tasklist, task buttons, window thumbnails, task grouping, task icon customization, exclusion lists, and task actions. It can replace the standard Windows taskbar, supplement it, or leave the Windows taskbar visible while NextSTART provides additional controls.
2.4 The taskbar as a container
The NextSTART taskbar is a skinnable container. By default it holds the Start Button, Quick Launch area, tasklist, system tray, tray clock, and system handle. It can also hold WorkShelf desktop modules in iconic or non-iconic form. Each section is optional, and the user can change the order in which sections appear. For example, the Start Button can appear at the end of the taskbar instead of the beginning.
The taskbar container itself can also be disabled. When that happens, the tasklist and system tray do not disappear; they can become independent floating desktop objects that can be positioned anywhere on the screen.
2.5 Internal Commands
Internal Commands are built-in Winstep actions that can be added to menus, hotspots, Quick Launch items, taskbar buttons, docks, shelves, and other Winstep objects. They provide access to actions such as Show Start Menu, Capture Desktop, Power Saving Mode, Alarm Manager, Media controls, Language Bar, Check for Updates, and many Windows system dialogs.
3. First run and basic use
3.1 Main menu and context menus
Example NextSTART main menu nsmainmenu.png
By default, the main NextSTART menu opens when you click the Start Button or bump the mouse pointer against the top-left corner of the screen. It can also be opened from other desktop hotspots, screen-edge activation methods, buttons, menus, or custom hotspots configured by the user. The menu can contain user shortcuts, system folders, internal commands, WorkShelf object references, and submenus.
Right-click context menus are one of the main command surfaces in NextSTART. Right-clicking a menu item, hotspot button, taskbar section, task button, tray icon, or Quick Launch item usually exposes object-specific commands such as properties, rename, delete, insert, browse, open, and parent-object preferences.
3.2 Item Properties
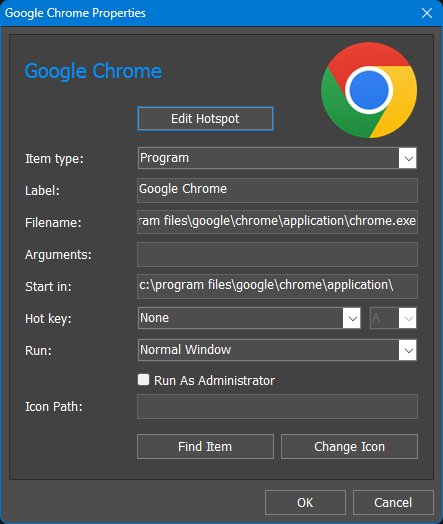
Item Properties dialog nsitemproperties.jpg
The Item Properties dialog controls a menu item, Quick Launch item, hotspot item, or other command item. Depending on the item type, it can define the target application, document, folder, internal command, arguments, icon, label, hotkey, working folder, run state, and additional behavior.
Target and command. Defines what the item runs or opens. This can be a program, document, folder, URL, internal command, menu, or object reference.
Label and icon. Controls the visible name and image used by the item. Icons can often be customized directly by dragging an image file onto the item.
Arguments and startup folder. For application items, arguments and working folder behave like the equivalent fields in a normal Windows shortcut.
Hotkey. Assigns a keyboard shortcut that activates the item directly.
3.3 Quick Launch buttons
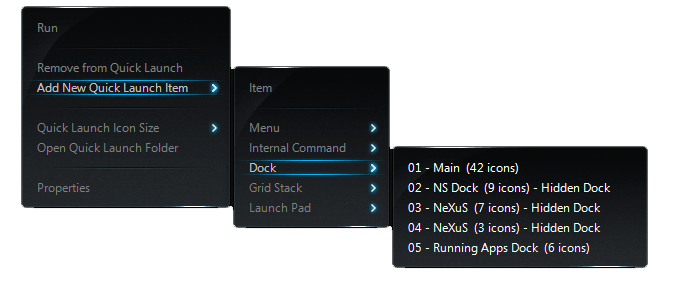
Quick Launch button context menu
Quick Launch buttons are hotspots displayed in the Quick Launch area of the NextSTART taskbar. They can be user-created NextSTART Quick Launch hotspots or shortcuts found in the old Windows Quick Launch folder. This means the Quick Launch area can contain both NextSTART-defined actions and traditional Quick Launch shortcut files.
To add a new Quick Launch button, right-click an existing Quick Launch button and choose Add New Quick Launch Item, then select the type of item you want to add. A Quick Launch button can launch an application, open a menu, run an internal command, act as a separator, or perform another supported hotspot action.
Although Quick Launch buttons can be associated with menus, they are not menus themselves. They are taskbar buttons/hotspots that perform an action when clicked.
3.4 Opening NextSTART Preferences
NextSTART Preferences is the main configuration dialog for menus, hotspots, the taskbar, themes, sounds, general options, advanced options, and troubleshooting tools.
You can open NextSTART Preferences in several ways:
Open the main NextSTART menu and choose Settings ->Preferences.
Double-click the titlebar of a NextSTART menu.
Press Ctrl+F12. This is the default Preferences hotkey and can be changed later in the General tab of NextSTART Preferences.
Right-click the NextSTART system tray icon and choose Preferences.
Once open, the tabs along the top of the Preferences dialog provide access to the major NextSTART settings pages. The following chapters describe these tabs and related features in more detail.
4. Working with Menus
Menus are central to NextSTART. Most NextSTART workflows begin with a menu: a Start menu replacement, a project menu, a folder-browsing menu, a desktop button menu, a screen-edge menu, or a taskbar button menu. This chapter therefore goes deeper than a simple Preferences-tab description.
4.1 Anatomy of a menu
A NextSTART menu can include a titlebar, titlebar buttons, the menu area, a selection bar, separators, scroll buttons, and an endcap.
Part
Purpose
Titlebar
Shows the menu name and can be used to move, close, roll up, rotate, or access menu-related commands depending on the theme and settings.
Titlebar buttons
Optional buttons can close the menu, rotate it between vertical and horizontal orientation, roll it up or down, or keep it always on top.
Menu area
Contains command items and submenu items. An arrow normally indicates a submenu; a command item runs its assigned action.
Selection bar
Highlights the selected item and enables full keyboard navigation when enabled.
Separators
Divide a menu into sections. Their appearance depends on the current theme.
Scroll buttons
Appear when the menu is too large to fit on screen.
Endcap
Completes the visual shape of the menu and can often be used like the titlebar for moving or accessing menu commands.
4.2 Moving, closing, rolling up, rotating, and keeping menus on top
To move a menu, drag its titlebar or endcap. Moving the main menu can update its position relative to the hotspot that opened it, unless that hotspot is configured to snap the menu to the mouse pointer. Submenus normally do not remember manually dragged positions.
If you drag a submenu away from its parent menu, it becomes independent and stays on screen until you close it. This is useful when you want to keep a submenu open as a temporary floating launcher or reference menu.
Closing menus. A menu can be closed through its close button, by right-clicking its titlebar or endcap, by pressing Esc when keyboard navigation is active, or by clicking elsewhere if the hotspot is configured to close menus automatically.
Rolling up menus. Rolling up leaves only the titlebar visible. This is useful for menus meant to remain on screen without taking much space. If the theme does not provide a roll-up button, Ctrl plus a titlebar/endcap click can be used.
Rotating menus. Menus can be displayed vertically or horizontally. Horizontal menus are useful for always-open menus placed near the top or bottom of the screen. If the theme does not provide a rotate button, Shift plus a titlebar/endcap click can toggle orientation.
Always on top. Always-on-top menus remain above normal windows. If the theme does not provide a z-order button, Alt plus a titlebar/endcap click can toggle the state.
4.3 Menu navigation and command execution
Menus can be used with the mouse or keyboard. With the mouse, click an item to execute it or click/hover an item with an arrow to open its submenu, depending on the current submenu settings. With keyboard navigation, the selection bar moves through items and can execute commands or open submenus.
Arrow keys. Up and Down move through items. Home and End jump to the beginning or end. Right opens a submenu; Left closes the current submenu and returns to the parent menu.
Enter. Executes the selected command or opens the selected submenu. Holding Ctrl while pressing Enter executes the command without automatically closing the menu.
Letter navigation. Pressing a letter cycles through visible items whose names begin with that letter.
Hot letters. If the theme enables hot letters, a letter displayed at the right of a command can be used with Ctrl to execute that item directly.
Document thumbnails. When supported, pausing over a document or video item can display a thumbnail next to the menu after a short delay.
Opening submenus as folders. A submenu item that represents a folder can be triple-clicked to open it as a folder in Explorer instead of opening it as a NextSTART submenu.
4.4 Scrolling and More pages
When a menu is too tall to fit on screen, NextSTART adds scroll buttons. These can use a classic top-and-bottom layout or both appear at the bottom, depending on the menu style and the Advanced menu settings. If automatic scrolling is enabled, hovering over a scroll button scrolls the menu without needing repeated clicks. Mouse-wheel scrolling is also supported.
Very large menus can also be split into several screen-sized pages. In that mode a More item appears at the bottom of the visible menu and opens the next page next to the current one. This allows menus to contain very large numbers of items while remaining usable.
4.5 Detaching sub-menus
A sub-menu can be detached from its parent menu and left on screen as an independent floating menu. This is useful when a sub-menu contains tools, folders, links, or commands that the user wants to keep available while working elsewhere.
Detaching a sub-menu. Drag the sub-menu by its titlebar away from the parent menu. Once detached, it stays on screen even if the parent menu is closed.
Sub-menus without visible titlebar buttons. Even when a theme does not draw a full titlebar with buttons, a menu still has a titlebar section or upper edge. Use that upper edge for menu-level actions.
Closing a detached sub-menu. If the detached sub-menu has normal titlebar buttons, close it with the close button. If it does not, right-click the top of the menu or titlebar section to close it.
Why detach sub-menus? Detached sub-menus act like temporary floating launchers or reference panels. They are especially useful for frequently used project folders, command groups, or tool menus that should remain available after the original parent menu is dismissed.
4.6 Drag and drop in menus
NextSTART menus support extensive drag and drop. Files, folders, shortcuts, URLs and documents can be dragged from Explorer into a menu. Existing menu items can be moved or copied between menus. Items can also be dragged out of menus into Explorer or onto the desktop when appropriate.
Adding items from Explorer. Drag a file, folder, shortcut, or URL from Explorer into an editable menu to create a new menu item.
Copying or moving between menus. Drag an item from one menu to another. Use modifier keys where appropriate to choose copy instead of move.
Rearranging items. Drag items within a menu to change their order. Separators can be used to create logical groups.
Folder browsing. Folder items can open as browse menus, letting the user navigate folder contents without opening an Explorer window.
4.7 Menu context menus
Right-clicking a menu item exposes commands for editing and using that item. The exact commands depend on item type, but common commands include Insert, Open, Delete, Rename, Properties, Browse with NextSTART, and folder/object conversion commands where supported.
Insert. Adds a new item, separator, submenu, internal command, program item, folder item, or other supported object.
Open. Runs the selected item or opens the underlying file, folder, or command target.
Delete. Removes the item from the menu. For live folder views, deletion may affect the underlying file or shortcut.
Rename. Changes the visible label of the menu item.
Properties. Opens the item properties dialog for detailed configuration.
Browse with NextSTART. Opens a folder item as a NextSTART browse menu instead of a normal Explorer window.
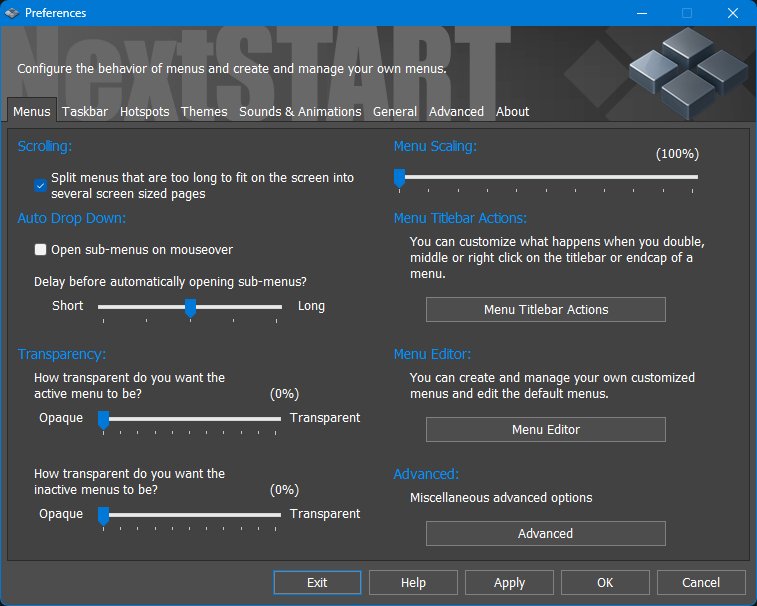
4.8 Menus tab
Preferences - Menus tab nsmenus.jpg
The Menus tab in Preferences controls general menu behavior and opens secondary dialogs for titlebar actions, menu editing, and advanced menu options.
Split menus that are too long to fit on the screen into several screen sized pages. When enabled, very large menus are split into pages instead of relying only on scrolling. A More item opens additional pages. This setting is enabled by default.
Open sub-menus on mouseover. Opens submenus automatically when the pointer rests on a submenu item. When disabled, the user must click to open the submenu.
Delay before automatically opening sub-menus. Controls the hover delay used when submenus open on mouseover.
Active menu transparency. Sets the transparency of the currently active menu.
Inactive menu transparency. Sets the transparency of open menus that are not currently active.
Menu Scaling. Makes menus larger by manually scaling their graphics and text. This can be useful when a theme uses very small fonts on a high-DPI display, or to make menus easier to read. This manual scaling can be combined with NextSTART's automatic high-DPI menu scaling. To disable automatic high-DPI menu scaling while still leaving manual menu scaling available, use Disable menu scaling on high DPI settings in Advanced Menu Options.
Menu Titlebar Actions. Opens the dialog that assigns actions to double-click, middle-click, and right-click on a menu titlebar or endcap.
Menu Editor. Opens the built-in editor used to create and manage customized menus and edit default menus.
Advanced. Opens miscellaneous advanced menu options.
4.9 Menu Titlebar Actions
Menu Titlebar Actions dialog nsmenutitlebar.jpg
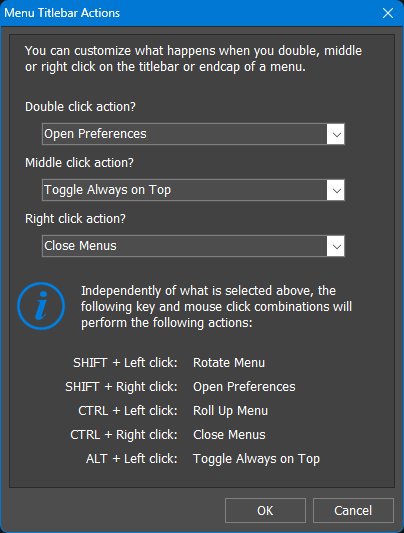
The Menu Titlebar Actions dialog defines what happens when the user double-clicks, middle-clicks, or right-clicks a menu titlebar or endcap. This allows themes with no visible titlebar buttons to remain fully functional, because the same actions can still be accessed through mouse clicks on the titlebar or endcap.
Available titlebar actions. Each mouse action can be assigned one of the available menu titlebar commands: Open Preferences, Close Menus, Close Sub-Menus, Roll Up Menu, Toggle Always on Top, or Rotate Menu.
4.10 Menu Editor
Menu Editor nsmenueditor.jpg
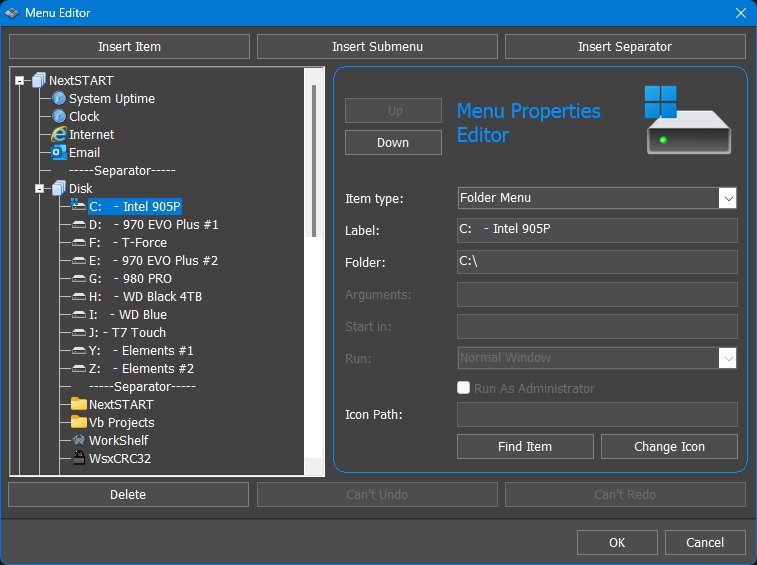
The Menu Editor is the main tool for creating and managing NextSTART menus. Use it to create new top-level menus, add submenus, insert items and separators, organize commands, assign icons, and define what each menu item does.
Menu tree. The tree on the left shows the menu structure being edited. It can contain top-level menus, submenus, menu items, separators, and other menu entries. Selecting an entry in the tree displays its editable properties on the right.
Add Menu. Creates a new top-level menu. When creating a menu, give it a label and a unique Menu ID. If the ID already exists, the Menu Editor automatically adds a suffix such as (1) to make the ID unique.
Insert Submenu. Creates a submenu inside the currently selected menu. The second button at the top of the editor is contextual: when the editor is at the menu-list level it appears as Add Menu; when a menu is selected it appears as Insert Submenu. Submenus also require a unique Menu ID, and the Menu Editor automatically adjusts duplicate IDs by adding a suffix.
Insert Item. Adds a new item to the selected menu or submenu. After inserting the item, choose the Item type on the right and fill in the fields required for that type.
Insert Separator. Adds a separator line to the selected menu. Separators are useful for dividing a menu into logical groups, such as applications, folders, system commands, and utilities.
Delete. Removes the selected menu, submenu, item, or separator. Deleting a menu or submenu also removes the items inside it, so use this command carefully.
Undo and Redo. Reverses or reapplies recent Menu Editor changes when available. These buttons are disabled when there is nothing to undo or redo.
Up and Down. Moves the selected item up or down within the current menu. Use these buttons to change the order in which menu items appear.
Item properties panel. The panel on the right shows the properties of the selected menu entry. When no editable item is selected, most fields are disabled. When an item is selected, the available fields change according to the selected Item type.
Menu ID. Identifies a menu or submenu internally. The Menu ID must be unique because it is used when menus are referenced by hotspots, Quick Launch buttons, menu items, and other NextSTART activation methods. If you enter an ID that already exists, the Menu Editor automatically adds a suffix, for example Existing ID (1).
Menus and submenus are not interchangeable. A top-level menu cannot be turned into a submenu, and an existing submenu cannot be promoted into a top-level menu. If you need a different structure, create the new menu or submenu in the correct place and move or recreate the items there.
Item type. Defines what the selected menu entry does. Available item types include Program, Internal Command, Folder Menu, Menu, Running Applications Menu, Separator, Theme, Themes Menu, Virtual Folder Menu, Time, System Uptime, Media Player Menu, System Tray Menu, URL, Frequent Programs Menu, Apps Menu, Nexus Dock, Grid Stack, and Launch Stack.
Program. Runs the application or executable specified in the filename field. Program items can also use arguments, a startup folder, a run state, and the Run As Administrator option.
Internal Command. Runs one of NextSTART's built-in commands. Internal commands can show system dialogs, control Winstep features, open special menus, toggle desktop states, run power-saving actions, and perform other built-in operations.
Folder Menu. Opens the contents of a folder as a NextSTART menu. This is useful for drives, project folders, document folders, tool collections, and other folder-based launch menus.
Menu. Opens another NextSTART menu. Use this item type when you want to place a link to one menu inside another menu, such as adding a custom menu to the main NextSTART menu.
Running Applications Menu. Displays a dynamic menu of currently running applications.
Separator. Inserts a non-command separator used to visually divide groups of menu items.
Theme. Applies a specific Winstep theme from a menu item.
Themes Menu. Displays a menu of available themes.
Virtual Folder Menu. Displays the contents of a Windows virtual or shell folder as a menu, such as system locations managed by Windows rather than ordinary disk folders.
Time. Displays the current time directly on a menu item.
System Uptime. Displays how long the system has been running.
Media Player Menu. Adds media-player related controls or status items to a menu.
System Tray Menu. Displays system tray contents or tray-related commands as a menu.
URL. Opens a web address or other URL target.
Frequent Programs Menu. Displays a dynamic menu of frequently used programs.
Apps Menu. Displays installed Windows apps in menu form.
Nexus Dock, Grid Stack, and Launch Stack. Opens or references compatible Winstep objects where available.
Label. Sets the visible name of the selected menu item.
Filename, Folder, URL, Menu, or Command field. The main target field changes depending on the selected item type. A Program item needs a filename, a Folder Menu needs a folder path, a URL item needs a web address, a Menu item needs the
Menu ID of the sub-menu to open, and an Internal Command item needs the command to run.
Arguments. For program items, passes command-line arguments to the target application.
Start in. Sets the working folder used when launching a program item.
Run. Selects the initial window state for program items, such as normal, minimized, or maximized, depending on the available choices.
Run As Administrator. Runs the selected program item elevated. Use this only for applications that genuinely require administrator rights.
Icon Path. Specifies the icon used by the selected item. The icon can come from an executable, icon file, image file, or other supported source.
Find Item. Browses for the file, folder, command target, menu, or object associated with the current item type.
Change Icon. Lets you choose a different icon for the selected item.
Typical workflow. To build a menu from scratch, click Add Menu, give the new menu a label and unique Menu ID, then add content with Insert Item, Insert Submenu, and Insert Separator. For each inserted item, choose the appropriate Item type, such as Program, Folder Menu, Menu, or Internal Command, then fill in the fields required by that type.
Submenus and linked menus. Use Insert Submenu when you want to create a submenu inside the selected menu. Use an item of type Menu when you want one menu item to open another existing menu, such as adding a custom menu to the main NextSTART menu.
Organizing menu items. Use Up and Down to reorder items, Insert Separator to divide the menu into logical groups, and Change Icon to customize item icons where appropriate.
Building menu contents outside the Menu Editor. After creating the basic menu or submenu in the Menu Editor, its contents can also be built directly from the live menu. Files, folders, shortcuts, and existing menu items can be added or rearranged by drag and drop. You can also right-click a menu and use the Insert New Item context menu options to add programs, folders, submenus, internal commands, separators, and other supported item types.
The Menu Editor is best used to create the menu structure and define menu IDs. After that, menus can be populated and refined either in the editor or directly from the live menus using drag and drop and right-click context menus. Menus created in the Menu Editor can be assigned to hotspots, Quick Launch buttons, taskbar buttons, desktop buttons, or other NextSTART activation methods.
4.11 Advanced menu settings
Advanced menu settings nsmenuadvanced.jpg
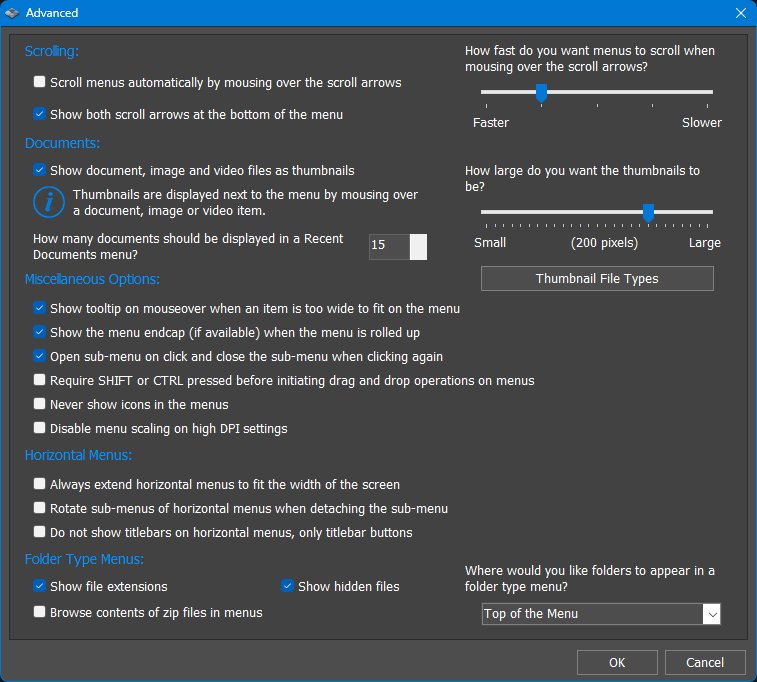
The Advanced menu settings dialog collects detailed behavior options for menu scrolling, document thumbnails, drag-and-drop safety, horizontal menus, and folder-type browse menus.
Scroll menus automatically by mousing over the scroll arrows. When enabled, placing the pointer over a menu scroll arrow scrolls the menu continuously. When disabled, the user must click the scroll arrows or use the mouse wheel/keyboard to scroll.
Show both scroll arrows at the bottom of the menu. Places both scroll controls at the lower end of the menu instead of using one control at the top and one at the bottom. This can make scrolling easier with some menu themes or screen-edge menu positions.
Menu scroll speed. Controls how fast a menu scrolls when the pointer rests over a scroll arrow. Move the slider toward Faster for quick traversal of long menus or toward Slower for finer control.
Show document, image and video files as thumbnails. Displays preview thumbnails for supported document, image, and video files when the pointer rests over those items in a menu. Thumbnails are shown next to the menu when mousing over a supported document, image, or video item, allowing the user to identify files without opening them.
Thumbnail size. Controls the size of menu thumbnails. Larger thumbnails are easier to recognize but take more screen space.
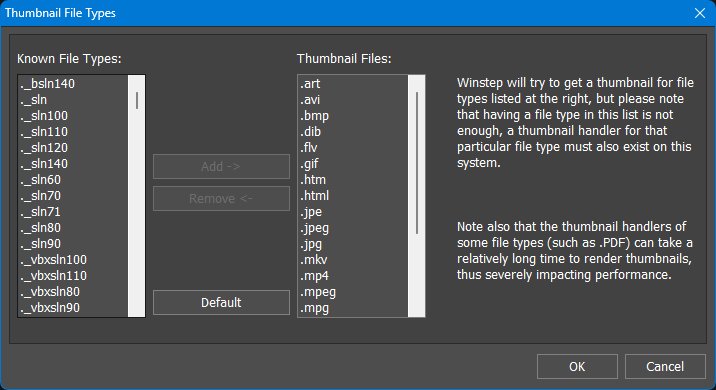
Thumbnail File Types. Opens the dialog where the file extensions eligible for thumbnail previews can be configured.
Thumbnail file types nsthumbnails.jpg
Recent Documents count. Sets how many documents appear in a Recent Documents menu.
Show tooltip on mouseover when an item is too wide to fit on the menu. Shows the full item name in a tooltip when the menu column is not wide enough to display the whole label.
Show the menu endcap when the menu is rolled up. If the current theme provides an endcap, the endcap remains visible when the menu is rolled up. This gives the user a visible target for restoring or manipulating the rolled-up menu.
Open sub-menu on click and close the sub-menu when clicking again. Makes submenu items behave like a toggle: clicking the item opens its submenu, and clicking the same item again closes it.
Require SHIFT or CTRL pressed before initiating drag and drop operations on menus. Prevents accidental menu rearrangement by requiring a modifier key before drag-and-drop editing begins inside menus.
Never show icons in the menus. Hides item icons in menus
even on themes that show icons, producing a more compact text-only menu appearance.
Disable menu scaling on high DPI settings. Prevents NextSTART from automatically scaling menus because of Windows high-DPI settings. Enable this if menus appear too large or if you prefer to control menu size manually through Menu Scaling.
Always extend horizontal menus to fit the width of the screen. For horizontal menus, stretches the menu across the available screen width instead of sizing only to its contents.
Rotate sub-menus of horizontal menus when detaching the sub-menu. When enabled, a vertical submenu detached from a horizontal menu is
automatically rotated into horizontal orientation.
Do not show titlebars on horizontal menus, only titlebar buttons. Hides the full titlebar area on horizontal menus while retaining the titlebar buttons
(if any), producing a slimmer horizontal menu strip.
Show file extensions. In folder-type menus, displays file extensions such as .txt, .exe, or .jpg instead of hiding them.
Show hidden files. Allows hidden files to appear in folder-type menus.
Browse contents of zip files in menus. Allows ZIP files to be browsed as menu containers. Disable this if ZIP browsing is not wanted or if very large archives make menus slower.
Folder position in folder-type menus. Controls where folders appear relative to files in a folder-type menu, such as at the top of the menu.
5. The NextSTART Taskbar
5.1 Taskbar tab
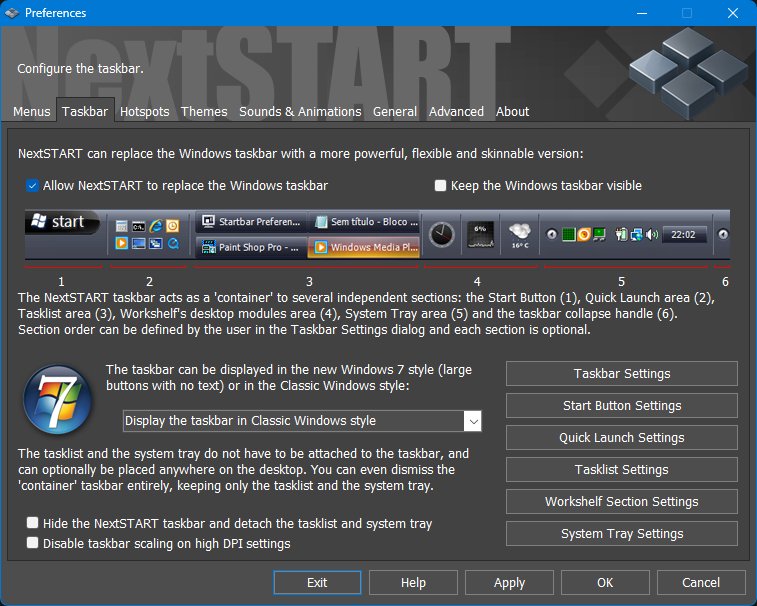
Preferences - Taskbar tab nstaskbar.jpg
The Taskbar tab controls whether NextSTART replaces the Windows taskbar and how the taskbar container is assembled. In NextSTART the taskbar is not a single fixed strip; it is a skinnable container made from optional sections.
Allow NextSTART to replace the Windows taskbar. Enables the NextSTART taskbar and lets it take over the role normally handled by the Windows taskbar.
Keep the Windows taskbar visible. Leaves the original Windows taskbar on screen instead of hiding it when the NextSTART taskbar is active. This is useful while testing a layout or when the user wants both taskbars available.
Taskbar preview diagram. The numbered preview identifies the taskbar sections: Start Button, Quick Launch area, Tasklist, optional WorkShelf desktop module area, System Tray area, and the taskbar collapse handle. These sections can be shown, hidden, and reordered.
Taskbar style. Selects between a newer large-button style with no text labels and the classic Windows style. This changes the basic task button presentation used by the taskbar.
Hide the NextSTART taskbar and detach the tasklist and system tray. Hides the taskbar container while allowing the tasklist and system tray to exist as independent floating objects on the desktop.
Disable taskbar scaling on high DPI settings. Prevents NextSTART from automatically scaling the taskbar on high-DPI systems. This is mostly useful when a theme or layout has been designed for a fixed pixel size.
Start Button Settings. Opens the Start Button settings, where the Start Button can be shown or hidden and assigned to the hotspot/menu action it should perform.
Quick Launch Settings. Opens the settings for the Quick Launch section, including icon size, automatic retrieval of Windows Quick Launch shortcuts, maximum section width, and collapse behavior.
Tasklist Settings. Opens the tasklist settings for running applications, grouping, labels, recent files, task icons, floating tasklist behavior, and exclusions.
WorkShelf Section Settings. Opens the settings for capturing WorkShelf modules into the NextSTART taskbar when WorkShelf is running.
System Tray Settings. Opens system tray and tray clock options, including icon size, control button behavior, clock/date display, floating tray behavior, and tray icon customization/exclusion.
5.2 Taskbar Settings
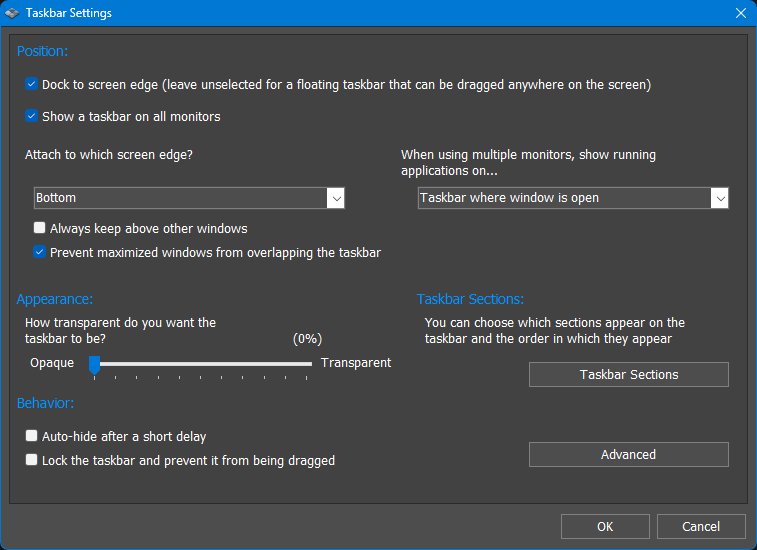
Taskbar Settings nstaskbarsettings.jpg
The Taskbar Settings dialog controls the taskbar container itself: where it lives, whether it is docked or floating, how it behaves on multiple monitors, how transparent it is, and whether it reserves screen space.
Dock to screen edge. Docks the taskbar to a screen edge. When this option is off, the taskbar becomes a floating object that can be dragged anywhere on the screen.
Show a taskbar on all monitors. Creates a NextSTART taskbar on each monitor instead of using only one monitor.
Attach to which screen edge? Selects the edge used by a docked taskbar, such as Bottom. This is the taskbar equivalent of choosing which screen edge owns the container.
When using multiple monitors, show running applications on... Controls how task buttons are distributed across multiple taskbars. For example, the taskbar can show only the windows open on that monitor, or use another available multi-monitor task display mode.
Always keep above other windows. Keeps the taskbar above normal application windows.
Prevent maximized windows from overlapping the taskbar. Reserves screen space for the taskbar so maximized windows stop at the taskbar edge instead of covering it.
Taskbar transparency. Sets how transparent the taskbar is while visible. Lower values are more opaque; higher values let more of the desktop show through.
Auto-hide after a short delay. Hides the taskbar automatically when it is not being used. The advanced taskbar dialog controls some of the fine details of this behavior.
Lock the taskbar and prevent it from being dragged. Prevents accidental repositioning of the taskbar with the mouse.
Taskbar Sections. Opens the dialog used to enable, disable, and reorder the taskbar sections.
Advanced. Opens additional hide/activation behavior, including hiding into the screen edge, hidden transparency, and edge-bump activation options.
5.3 Taskbar sections and ordering
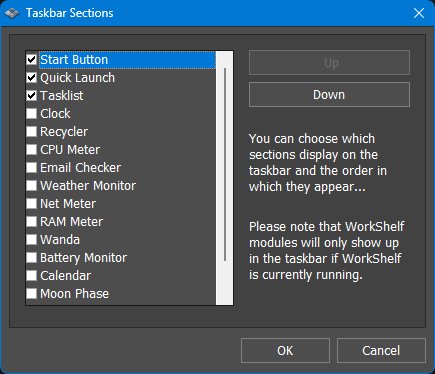
Taskbar sections and ordering nstaskbarsections.jpg
The taskbar is made from independent sections. Each section can be enabled or disabled and the visible sections can be reordered.
Section list. Shows available taskbar sections such as Start Button, Quick Launch, Tasklist, various WorkShelf
desktop modules, and System Tray.
WorkShelf desktop modules: When WorkShelf is running, desktop modules such as the Clock, Recycler, and other available modules can optionally be captured into the NextSTART taskbar. Captured modules can appear either as full-size modules or in iconic format, with iconic format being the default. The detailed capture options are described later in 6.10 WorkShelf modules in the taskbar.
Check boxes. Enable or disable each section without deleting its settings. For example, the Quick Launch area can be hidden while keeping its configuration for later.
Up / Down. Moves the selected section earlier or later in the taskbar. This controls the physical order in which sections appear.
Theme-dependent availability. Some sections only appear when the current theme supports them or when the related Winstep component is running. WorkShelf modules only appear when WorkShelf is currently running.
5.4 Advanced taskbar settings
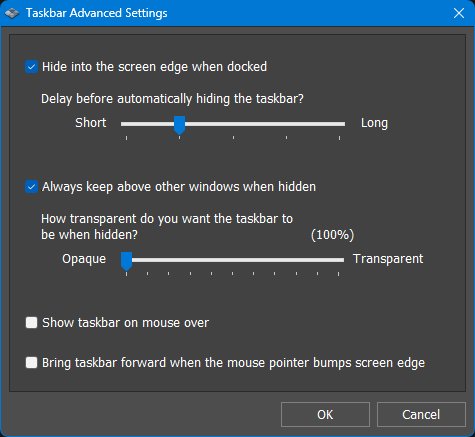
Advanced taskbar settings nstaskbaradvanced.jpg
The Taskbar Advanced Settings dialog controls the details of auto-hide and edge activation behavior for the taskbar container.
Hide into the screen edge when docked. Controls how a docked taskbar hides when auto-hide is active or when the taskbar is manually hidden by clicking its handle. The taskbar can slide into the screen edge it is docked to, or hide toward the perpendicular edge so that only the small taskbar handle remains visible at the side. The handle can then be used as the visible activation target for bringing the taskbar back.
Delay before automatically hiding the taskbar. Sets how long NextSTART waits before hiding the taskbar after the pointer leaves it. Shorter values feel more responsive; longer values reduce accidental hiding.
Always keep above other windows when hidden. Keeps the hidden edge-sensitive taskbar area above normal windows so it remains easy to activate.
Taskbar hidden transparency. Controls how transparent the taskbar is while hidden or semi-hidden. At high transparency the hidden taskbar becomes nearly or completely invisible.
Show taskbar on mouse over. Causes the taskbar to appear when the mouse pointer moves over its hidden area
or handle.
Bring taskbar forward when the mouse pointer bumps screen edge. Uses an edge-bump activation method: moving the pointer into the screen edge brings the taskbar forward.
5.5 Disabling the taskbar container
The taskbar container is optional. Disabling it does not necessarily disable task management. The tasklist and system tray can detach and become independent floating objects on the desktop. This is useful when the user wants the functionality of task buttons or tray icons without a full taskbar strip.
6. Taskbar components
6.1 Start Button
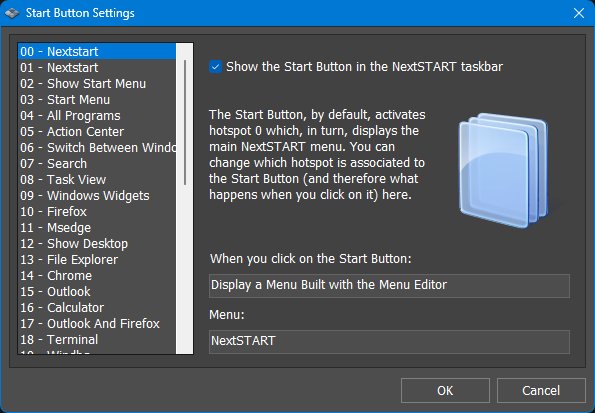
Start Button settings nsstartbutton.jpg
The Start Button is a taskbar section and also a hotspot. By default it activates hotspot 0, which opens the main NextSTART menu, but it can be assigned to a different hotspot action.
Hotspot list. The list on the left shows available hotspots and their names. Selecting a hotspot associates the Start Button with that hotspot.
Show the Start Button in the NextSTART taskbar. Controls whether the Start Button section is visible in the taskbar.
When you click on the Start Button. Displays the action currently performed by the selected hotspot, such as displaying a menu built with the Menu Editor.
Menu. Shows the menu currently opened by the selected Start Button hotspot, such as NextSTART.
Changing the Start Button action. To change what the Start Button does, edit or select the hotspot associated with it. Since the Start Button is a hotspot trigger, it can open a menu, launch a program, run an internal command, or perform another supported hotspot action.
6.2 Quick Launch
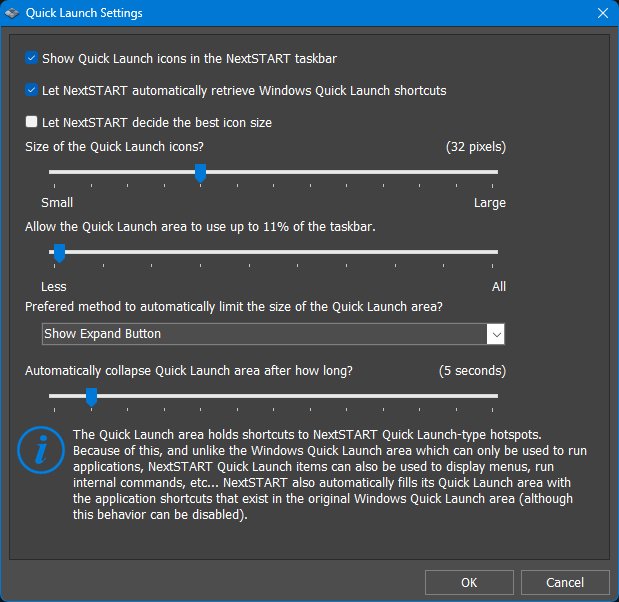
Quick Launch settings nsquicklaunch.jpg
The Quick Launch area holds shortcuts to NextSTART Quick Launch-type hotspots. It can also be automatically filled with shortcuts from the original Windows Quick Launch folder.
Show Quick Launch icons in the NextSTART taskbar. Shows or hides the Quick Launch section.
Let NextSTART automatically retrieve Windows Quick Launch shortcuts. Imports and displays shortcuts that exist in the original Windows Quick Launch area. This provides compatibility with older Quick Launch workflows.
Let NextSTART decide the best icon size. Allows NextSTART to choose an icon size that fits the current taskbar.
Size of the Quick Launch icons. Manually controls the icon size used by Quick Launch buttons when automatic sizing is not used.
Allow the Quick Launch area to use up to... Limits how much of the taskbar can be occupied by Quick Launch icons. This prevents Quick Launch from crowding out the tasklist, tray, or other sections.
Preferred method to automatically limit the size of the Quick Launch area. Selects how NextSTART handles overflow when there are too many Quick Launch icons. Show Expand Button keeps the visible Quick Launch area compact and lets the user expand it when needed. Reduce Icon Size shrinks the Quick Launch icons automatically to fit them into the available space, down to a minimum size of 16x16 pixels.
Automatically collapse Quick Launch area after how long? Sets how long an expanded Quick Launch area remains open before collapsing again.
Quick Launch-type hotspots. Unlike the old Windows Quick Launch area, NextSTART Quick Launch items can do more than launch applications: they can display menus, run internal commands, and perform other hotspot actions.
6.3 Tasklist
Tasklist settings nstasklist.jpg
The Tasklist displays running applications as task buttons. It can live inside the taskbar or be detached into a floating tasklist.
Hide the tasklist. Hides task buttons while leaving the rest of the taskbar available.
Hide tasklist button labels. Shows task buttons as icons only. This saves space and makes the taskbar more compact.
Show Recent Files in context menu. Adds the application's Windows Jump List recent items to the task button context menu when available. This lets you reopen recent documents or files associated with that application directly from its NextSTART task button.
Grouping. Controls how windows belonging to the same application are displayed. They can be grouped into a single icon, kept adjacent, or shown as separate buttons depending on the selected mode.
Size of the icons in the tasklist. Controls the size of icons used in task buttons.
Detach the tasklist from the NextSTART taskbar. Makes the tasklist an independent floating object instead of a section inside the taskbar container.
Tasklist Actions. Opens the dialog that defines what left, middle, and right mouse clicks do on task buttons.
Floating Tasklist Options. Opens the settings used when the tasklist is detached from the taskbar.
Customize Task Icons. Opens the task icon customization dialog. Task icons can also be customized quickly by dropping a supported image onto a task button.
Task Exclusion List. Opens the list used to prevent selected applications or windows from appearing in the tasklist, or to show them only when minimized.
Grouped task behavior. When similar windows are grouped into one button, the button represents several windows and can open a grouped application menu or previews so the user can choose the exact window.
6.4 Advanced tasklist options
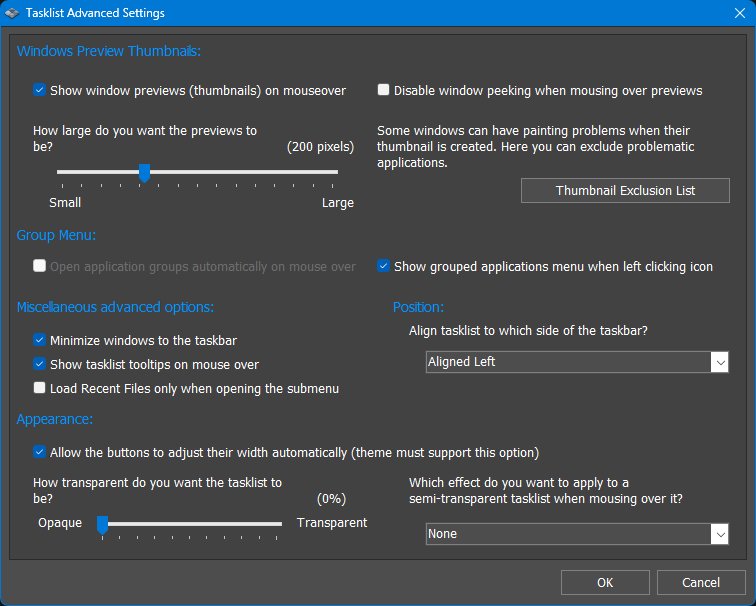
Advanced tasklist options nstasklistadvanced.jpg
The Tasklist Advanced Settings dialog controls task previews, grouping menus, task button behavior, alignment, transparency, and mouseover effects.
Show window previews (thumbnails) on mouseover. Shows live thumbnail previews when the pointer rests over a task button. For grouped task buttons, this allows the individual windows in the group to be selected from thumbnails instead of from a text menu.
Preview size. Sets how large window previews should be.
Disable window peeking when mousing over previews. Prevents the peek behavior that temporarily reveals the selected window when hovering over a preview.
Thumbnail Exclusion List. Opens the list of applications or windows that should not have thumbnails generated or refreshed because they cause painting, focus, performance, or compatibility problems.
Open application groups automatically on mouse over. Automatically opens the grouped applications menu when the pointer rests over a grouped task button. If live thumbnail previews are disabled, this menu lists the windows in the group, similar to the menu Windows shows when there are too many windows from the same application to display as thumbnails.
Show grouped applications menu when left clicking icon. Opens the grouped application menu when the user left-clicks a grouped task icon.
Minimize windows to the taskbar. Controls where window minimize animations collapse to. When enabled, windows minimize toward the NextSTART taskbar/tasklist instead of toward the Windows taskbar or another default minimize target.
Show tasklist tooltips on mouse over. Displays tooltips for task buttons when the pointer rests over them.
Load Recent Files only when opening the submenu. Loads an application's Windows Jump List recent items only when the Recent Files submenu is opened. This avoids preloading recent-document data for every task item and can make task menus open faster.
Align tasklist to which side of the taskbar? Controls how task buttons are aligned within the space reserved for the tasklist after the other taskbar sections, such as the Start Button, Quick Launch area, system tray, and clock, have taken their space. Task buttons can be aligned to the left, centered, or aligned to the right within the remaining tasklist area.
Allow the buttons to adjust their width automatically. Lets task buttons resize automatically when the theme supports it.
Tasklist transparency. Controls how transparent the tasklist is.
Semi-transparent tasklist mouseover effect. Selects what happens when the pointer moves over task buttons in a semi-transparent tasklist. None leaves the tasklist unchanged, Highlight Icon highlights only the task icon, and Highlight Button highlights the whole task button.
6.5 Tasklist actions
Tasklist actions nstasklistactions.jpg
The Tasklist Actions dialog defines what happens when the user clicks a task icon with the left, middle, or right mouse button. These settings are shared with WorkShelf.
Left click action. Sets what happens when the user left-clicks a task icon. The default visible setting, Bring to Front / Minimize, brings the window to the front if it is not already active, or minimizes it if it is already the active window.
Middle click action. Sets what happens when the user middle-clicks a task icon. This can be used for actions such as minimizing, closing, opening a new instance, or restoring similar windows, depending on the selected option.
Right click action. Sets what happens when the user right-clicks a task icon. The usual setting is Open Task Menu, which opens the NextSTART task menu for that running application.
Available task actions. Available actions include Nothing, Minimize, Bring to Front, Close, Bring to Front / Minimize, Open Task Menu, Minimize Similar, Restore Similar, and Close Similar.
Similar-window actions. The Minimize Similar, Restore Similar, and Close Similar actions apply to related windows belonging to the same application or task group, making it possible to manage several windows at once.
Task menu. The task menu can include window-management commands beyond the standard Windows menu, depending on the application and current tasklist configuration.
6.6 Floating tasklist
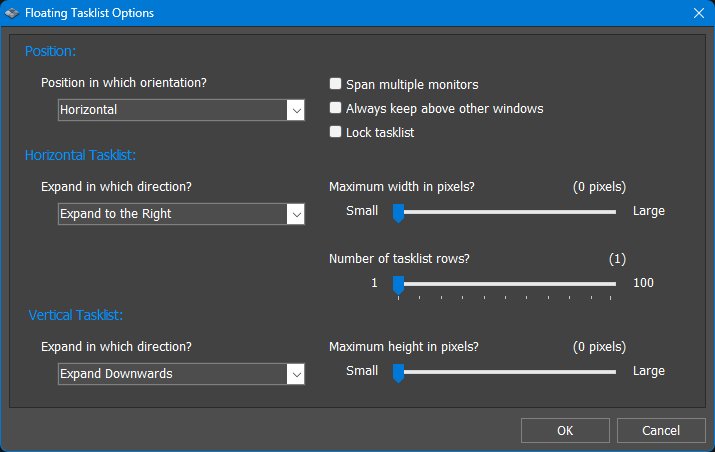
Floating tasklist options nsfloatingtasklist.jpg
When detached, the tasklist becomes an independent object on the desktop. The Floating Tasklist Options dialog controls its orientation, expansion direction, size limits, rows, and locking behavior.
Position in which orientation? Selects whether the floating tasklist is horizontal or vertical.
Span multiple monitors. Allows the floating tasklist to span more than one monitor.
Always keep above other windows. Keeps the floating tasklist above normal windows.
Lock tasklist. Prevents the floating tasklist from being accidentally moved or resized.
Horizontal Tasklist - Expand in which direction? Controls whether a horizontal floating tasklist grows to the right or in another available horizontal direction.
Maximum width in pixels. Sets a maximum width for a horizontal floating tasklist. A value of zero means no practical fixed maximum is being imposed by the slider setting.
Number of tasklist rows. Controls how many rows of task buttons a horizontal floating tasklist can use.
Vertical Tasklist - Expand in which direction? Controls whether a vertical floating tasklist grows downward or in another available vertical direction.
Maximum height in pixels. Sets a maximum height for a vertical floating tasklist.
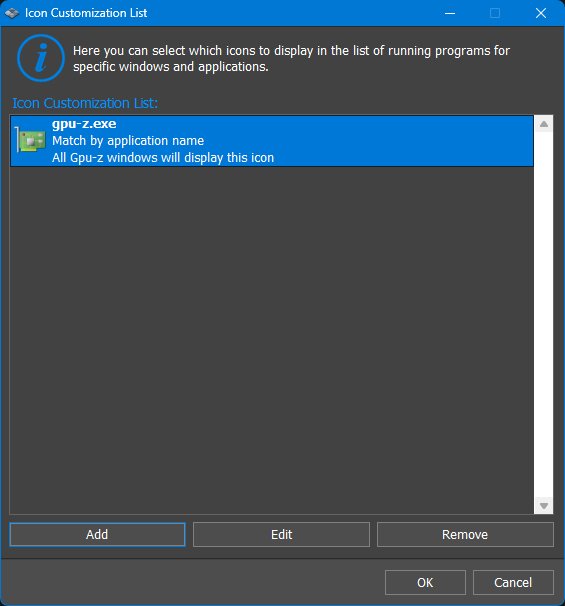
The Task Customization List lets the user replace task icons for specific applications or window-title matches.
Task customization list. Shows existing task icon customization rules. Each rule identifies an application or title match and the custom icon assigned to it.
Match by application name. Applies the custom icon to windows from a specific executable.
Match by window title. Applies the custom icon to windows whose title matches the configured text. This is useful when different windows from the same executable should use different icons.
Add. Creates a new task icon customization rule.
Edit. Changes the selected rule.
Remove. Deletes the selected rule.
6.8 Window thumbnails
NextSTART can display window thumbnails when the pointer rests over task buttons in the tasklist. On older versions of Windows, especially before live Desktop Window Manager previews were available, NextSTART had to retrieve these previews itself. Some applications do not respond well to this and may repaint incorrectly, flicker, or produce unusable thumbnails.
WorkShelf also uses window thumbnails for the icons of running applications. For this reason, the window thumbnail exclusion list is shared by NextSTART and WorkShelf.
The thumbnail exclusion options let you prevent specific windows or applications from having tasklist thumbnails retrieved or refreshed.
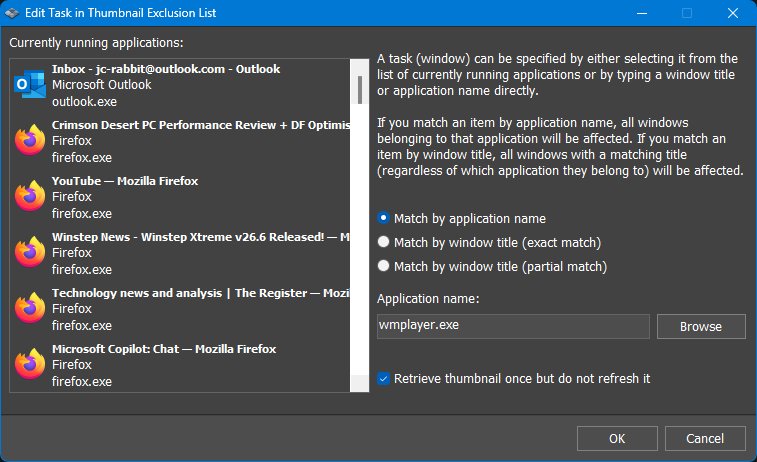
Thumbnail exclusion list nsthumbnailexclusion.jpg
Window Thumbnail Exclusion List. Lists applications and windows that should be excluded from tasklist window thumbnail retrieval or refresh.
Do not refresh window thumbnail. Allows a thumbnail to be retrieved once but prevents it from being refreshed repeatedly. This can help with applications that flicker, repaint badly, or behave incorrectly when their preview is updated.
Never display a window thumbnail. Completely prevents tasklist thumbnails from being displayed for matching windows or applications.
Currently running applications. Lets the user choose an existing window or application as the basis for a thumbnail exclusion rule.
Match by application name. Applies the rule to all windows belonging to the selected executable.
Match by window title (exact match). Applies the rule only to windows whose title exactly matches the configured text.
Match by window title (partial match). Applies the rule to any window whose title contains the configured text.
Application name. Specifies the executable name used by an application-name rule. Browse can be used to select an application directly.
Window title. Specifies the title text used by an exact or partial window-title rule.
Retrieve thumbnail once but do not refresh it. Creates a static tasklist preview after the first retrieval instead of continuously refreshing the thumbnail.
6.9 System tray and tray clock
System Tray settings nssystray.jpg
The System Tray Settings dialog controls the tray icon area, tray control button, tray clock display, detached/floating tray behavior, and tray icon customization/exclusion.
Windows 11 tray icon customization limitation. Starting with Windows 11 23H2, Microsoft began using XAML Islands for the system tray. This broke compatibility with all Win32 applications that need to retrieve information about tray icons. As a result, although direct access to the system tray itself is still possible, some of the tray icon customization methods described below no longer work on the original Windows tray icons.
Hide the system tray. Hides the tray icon area.
Enable fast system tray refresh. Increases the system tray refresh rate to real time so animated tray icons update smoothly.
Always show all system tray icons. Attempts to show all tray icons, including icons that Windows normally keeps in the hidden/expanded tray area. This works on Windows 10 and on Windows 11 systems using classic tray behavior, such as with ExplorerPatcher. On standard Windows 11 23H2 and later, Microsoft tray changes may limit this option to the tray icons currently visible on the Windows taskbar.
Always show all system tray icons in Systray menus. Shows all tray icons when the tray is presented through tray menus, even if some are normally hidden in the main tray area.
Icon size. Controls the size of tray icons.
Show the system tray control button. Displays a button used to access or expand the tray.
Transparent background when attached to taskbar. Makes the tray control area transparent when it is part of the taskbar, allowing the theme background to show through.
Show the time in the system tray control button. Displays the current time on the tray control button.
Show seconds in system tray clock. Adds seconds to the tray clock display.
Show the date in the system tray control button. Displays the date on the tray control button.
Automatically hide the system tray after. Makes the tray hide after a configurable delay when appropriate. The delay slider controls how quickly it collapses.
Detach the system tray from the NextSTART taskbar. Makes the tray an independent floating object instead of a taskbar section.
Always keep above other windows. Keeps the floating tray above normal windows.
Lock system tray. Prevents the floating tray from being accidentally moved.
Expand in which direction? Controls the direction in which the tray expands from its control button, such as Expand to the Right.
Enable tray icon customization. Allows NextSTART to replace small or blurry tray icons with higher-resolution images chosen by the user. This is useful because many original tray icons are still small 16x16 images and can look heavily blurred at larger icon sizes. Tray icon customization can also work with multi-state or animated tray icons, where supported.
Customize Tray Icons. Opens the tray icon customization list when tray icon customization is enabled.
Enable automatic exclusion. Automatically excludes tray icons that appear to display constantly changing histogram-style information. These icons often contain random-looking data and cannot be meaningfully customized. Excluding them avoids wasting resources trying to process images that should not be replaced.
Tray Exclusion List. Opens the list of tray icons excluded from tray icon customization. Use this for applications whose tray icons should remain untouched, especially icons that display live graphs, meters, or other constantly changing data.
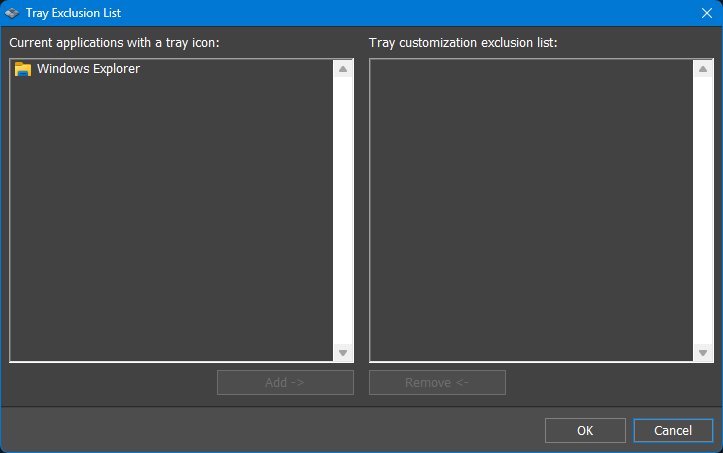
Tray icon exclusion list nstrayexclusion.jpg
Current application with a tray icon. Lists applications currently exposing tray icons.
Tray customization exclusion list. Lists tray applications excluded from customization or automatic handling.
Add / Remove. Moves selected tray applications into or out of the exclusion list.
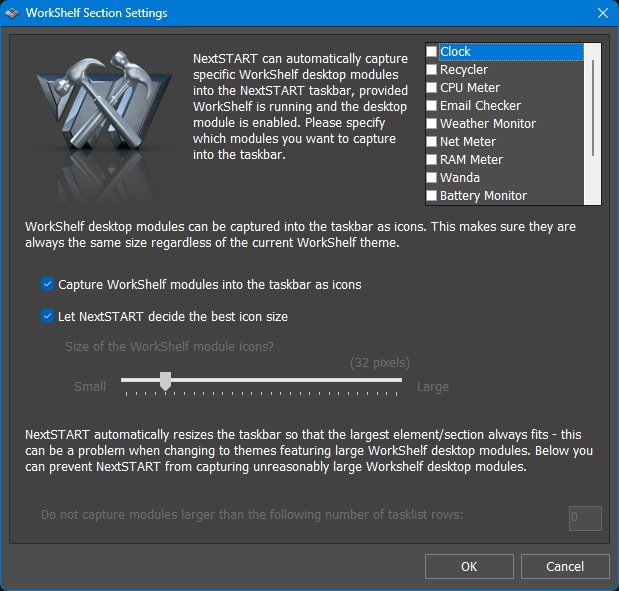
When WorkShelf is running, selected WorkShelf desktop modules can be captured into the NextSTART taskbar. By default, captured modules are shown in iconic format, which keeps the taskbar compact while still allowing the modules to display or monitor their normal information.
Module list. Shows the WorkShelf desktop modules that can be captured into the NextSTART taskbar, such as Clock, Recycler, CPU Meter, Email Checker, Weather Monitor, Net Meter, RAM Meter, Wanda, and Moon Phase.
Capture WorkShelf modules into the taskbar as icons. Captures the selected WorkShelf modules into the NextSTART taskbar in iconic format. This is the default and recommended capture mode, because iconic modules fit naturally into a taskbar without making it excessively large.
Capture modules at full size. WorkShelf desktop modules can also be captured at their normal desktop-module size instead of as icons. When this is used, the NextSTART taskbar adjusts its size to fit the larger module. This option is available for compatibility and flexibility, but it is disabled by default because full-size desktop modules can make the taskbar very large and waste screen space.
Let NextSTART decide the best icon size. Lets NextSTART choose a suitable iconic module size for the current taskbar and theme.
Module icon size. Manually controls the size of captured module icons when automatic sizing is not used. This applies to modules captured in iconic format.
WorkShelf dependency. This section is only available when WorkShelf is running. If WorkShelf is not running, desktop modules cannot be captured into the NextSTART taskbar.
Resource behavior. Captured modules are active modules. A module captured into the taskbar is still running and can perform its normal monitoring or display function, whether it is shown in iconic form or at full size.
7. Working with Hotspots
7.1 Hotspots tab
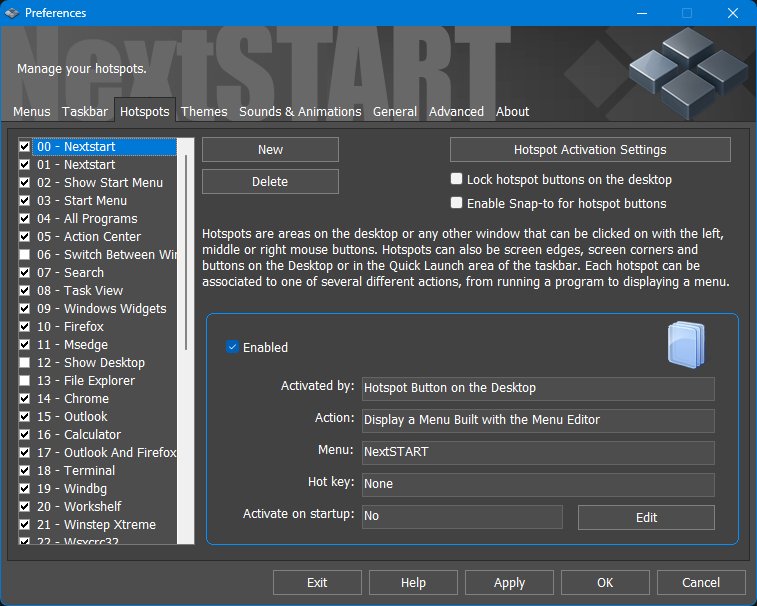
Preferences - Hotspots tab nshotspots.jpg
The Hotspots tab lists configured hotspots and shows the activation method, action, menu, hotkey, startup behavior, and enabled state for the selected hotspot.
Hotspot list. The left side lists hotspots by number and name. The check boxes enable or disable individual hotspots.
New / Delete. Creates a new hotspot or removes the selected hotspot.
Hotspot Activation Settings. Opens the global activation settings dialog.
Lock hotspot buttons on the desktop. Prevents desktop hotspot buttons from being moved accidentally.
Enable Snap-to for hotspot buttons. Makes desktop hotspot buttons snap into alignment when moved.
Enabled. Turns the selected hotspot on or off.
Activated by. Shows the activation method, such as a desktop hotspot button, taskbar button, screen edge, mouse button, or hotkey.
Action. Shows what the hotspot does, such as displaying a Menu built with the Menu Editor, running a program, opening a folder, executing an internal command, or creating a Quick Launch item.
Menu. When the hotspot displays a menu, this field shows the menu associated with it.
Hot key. Shows any keyboard shortcut assigned to the hotspot.
Activate on startup. Controls whether the hotspot action runs automatically when NextSTART starts.
Edit. Opens the selected hotspot in the Hotspot Wizard.
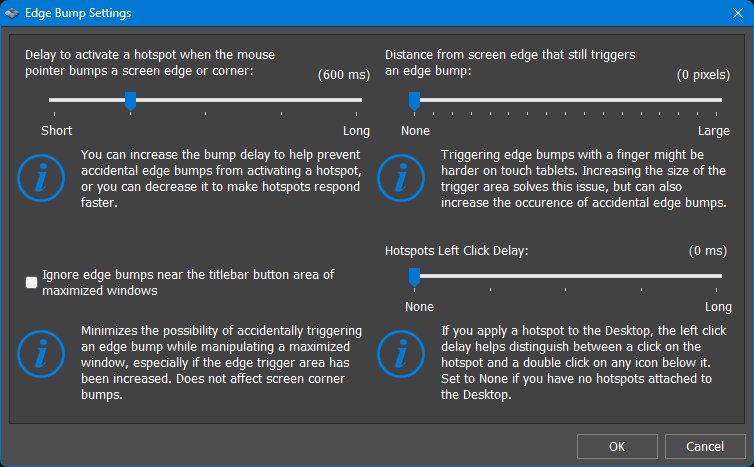
The Hotspot Activation Settings dialog controls the global sensitivity and safety delays used by screen-edge bumps, screen-corner bumps, desktop hotspots, and similar activation methods.
Edge/corner bump delay. Controls how long the pointer must remain against a screen edge or corner before the hotspot activates. A shorter delay feels faster; a longer delay helps prevent accidental activation.
Ignore edge bumps near the titlebar button area of maximized windows. Prevents edge bumps from triggering near the minimize, maximize, and close button area of maximized windows. This is useful when working with maximized applications near the screen edge.
Distance from screen edge that still triggers an edge bump. Expands the active trigger zone inward from the edge. This can help on touch tablets or high-DPI displays, but larger values can also increase accidental activations.
Hotspots Left Click Delay. When a hotspot is attached to the Desktop, this delay helps distinguish a hotspot click from a normal click or double-click on an icon below it. Set it to None if desktop hotspots are not being used.
Practical tuning. Increase delays or edge distance when hotspots trigger too easily. Decrease delays when hotspots feel sluggish or when screen-edge activation is the main way the user opens menus.
7.3 Hotspot actions
This section explains the relationship between the selected hotspot, its action, and its activation method. The full action and activation choices are described in the Hotspot Wizard tables in the next section.
Action. The action is what NextSTART does when the hotspot is triggered. Typical actions include opening a menu, launching a program, running an internal command, applying a theme, showing running applications, or activating a supported WorkShelf/Nexus object.
Activation method. The activation method is how the user triggers the action. A hotspot can be activated by a mouse click, a screen edge or corner bump, a visible desktop button, a Quick Launch button, or an optional keyboard shortcut.
Menu-based hotspots. When the action opens a menu, the hotspot also stores which menu to show, where it should appear, whether it uses a specific menu theme, and how other open menus should behave when an item is launched.
Program and command hotspots. Program hotspots store the file to launch, optional command-line arguments, working folder, initial window state, and whether the target should run elevated. Internal Command hotspots instead select one of NextSTART's built-in commands.
Desktop and Quick Launch buttons. Some activation methods create visible buttons. Desktop hotspot buttons can have their own icon, size, label, tooltip, and always-on-top behavior. Quick Launch buttons appear in the NextSTART taskbar Quick Launch area when the taskbar and Quick Launch section are enabled.
Hotspot groups. Hotspots can be grouped. Menus in the same group are self-exclusive, so opening one can close other open menus in that group. Use separate groups for menus that should remain independent.
Use this section as the conceptual overview, then use the Hotspot Wizard section below as the step-by-step reference for the actual choices shown by the wizard.
7.4 Hotspot Wizard
Hotspot Wizard - main page nshotspotwizardmain.jpg
The Hotspot Wizard guides the user through creating or editing a hotspot. The first page combines the most important choices: what the hotspot does, how it is activated, whether it should also have a keyboard shortcut, and how menu hotspots should be grouped.
What do you want to do?
This page selects the action performed by the hotspot.
Action
What it does
Display a Folder Menu
Opens a menu showing the contents of a selected folder.
Display a Menu
Opens one of the menus managed by the Menu Editor, such as a custom menu, the NextSTART menu, Preferences, Search, Control Panel, or similar predefined menus.
Run a Program
Launches an application, document, shortcut, or other file.
Run an Internal Command
Runs one of NextSTART's built-in internal commands, such as opening Preferences, showing the desktop, applying a theme, or performing another internal action.
Show Running Applications
Displays a task-oriented menu listing currently running applications.
Apply a Theme
Applies a specific NextSTART/Winstep theme from the hotspot.
Show All Themes
Displays a theme-selection menu so the user can choose from available themes.
Show a Virtual Folder Menu
Displays the contents of a Windows virtual folder through a menu.
Show Media Player Controls
Displays media playback controls, where supported.
Display the System Tray
Shows system tray icons through a menu.
Open a Web Site
Opens a configured web address.
Frequently Used Applications
Displays a menu populated with frequently used applications.
Universal Apps
Displays a menu of installed Universal/modern Windows apps.
Open a Nexus Dock
Activates a Nexus/WorkShelf dock from NextSTART.
Open a Grid Stack
Activates a WorkShelf/Nexus Grid Stack from NextSTART.
Run a Launch Pad
Runs a WorkShelf/Nexus Launch Pad from NextSTART.
Perform this action when NextSTART runs. Runs the selected hotspot action automatically when NextSTART starts. This is useful for menus, desktop buttons, taskbar elements, or objects that should appear immediately after startup.
How do you want to do it?
This page selects the activation method used to trigger the hotspot action.
Activation method
What it means
Left-click a Hotspot
Runs the action when the user left-clicks the configured hotspot area or object.
Middle-click a Hotspot
Runs the action when the user middle-clicks the configured hotspot area or object.
Right-click a Hotspot
Runs the action when the user right-clicks the configured hotspot area or object.
Bump a screen corner
Runs the action when the pointer is pushed into the top-left, bottom-left, top-right, or bottom-right screen corner.
Bump a screen edge
Runs the action when the pointer is pushed against the top, bottom, left, or right screen edge.
Middle-click anywhere
Runs the action when the user middle-clicks the desktop/work area, depending on the configured hotspot behavior.
Hotspot Button on the Desktop
Creates a visible desktop button that runs the hotspot action when clicked.
Button in the Quick Launch area
Adds the hotspot as a button in the NextSTART Quick Launch area.
Hotkey. Optionally assigns a keyboard shortcut that activates the hotspot without using the mouse.
Hotspot group. Hotspots can be clustered into groups. Menus in the same group are self-exclusive, so activating one hotspot automatically closes open menus associated with other hotspots in that group. Type a new group name to create a separate group.
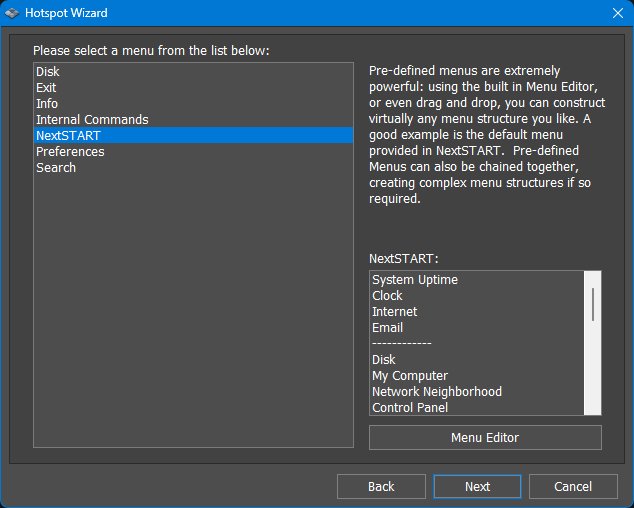
Hotspot Wizard - menu action nshotspotwizardmenus.jpg
Select a menu. When the action displays a Menu Editor menu, this page selects which menu to display. Built-in and user-created menus can be used, and menus can be chained to create complex menu structures.
Pre-defined menus. The wizard can use menus such as NextSTART, Internal Commands, Preferences, Search, Control Panel, Network Neighborhood, My Computer, and other menus created or managed in the Menu Editor.
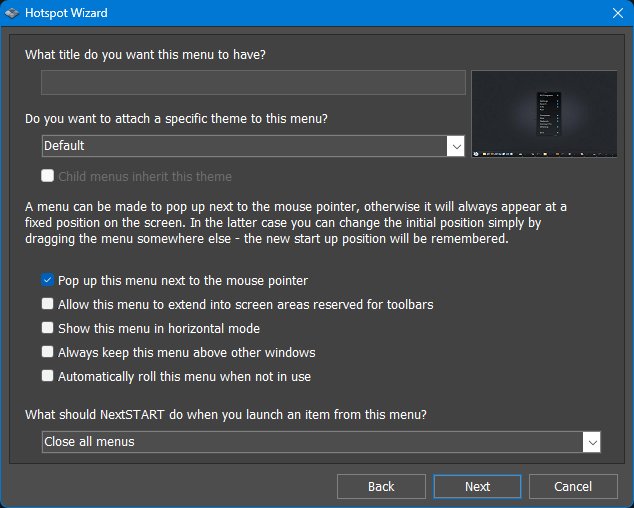
Hotspot Wizard - menu options nshotspotwizardmenus2.jpg
Menu title. Sets the title displayed by the menu created by the hotspot.
Specific menu theme. Allows a particular theme to be attached to this menu instead of simply using the current default menu theme.
Pop up this menu next to the mouse pointer. Makes the menu open near the pointer. When disabled, the menu opens at a fixed screen position; the user can drag the menu to a new position and NextSTART remembers it.
Allow this menu to extend into screen areas reserved for toolbars. Lets the menu occupy screen space normally reserved by toolbars or taskbars. This can be useful for menus opened near screen edges.
Show this menu in horizontal mode. Displays the menu horizontally instead of vertically.
Always keep this menu above other windows. Keeps the menu on top of normal application windows.
Automatically roll this menu when not in use. Rolls the menu up when it is idle, leaving a smaller titlebar/endcap footprint until the user needs it again.
What should NextSTART do when you launch an item from this menu? Controls menu-closing behavior after an item is launched, such as closing all menus or leaving some menus open depending on the selected choice.
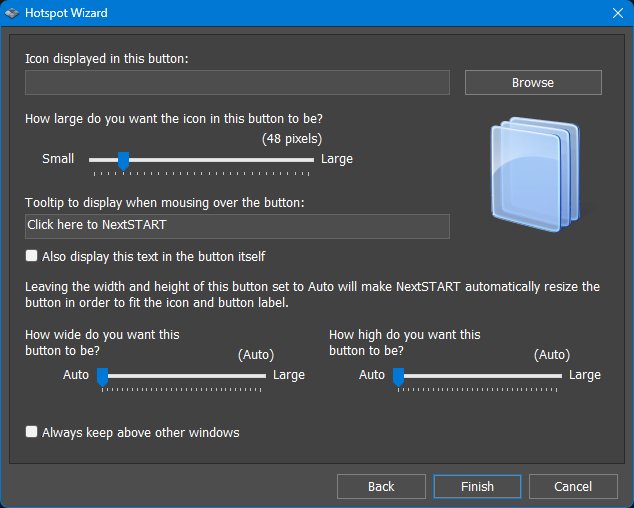
Icon displayed in this button. Selects the icon used by a desktop hotspot button. Browse can be used to choose a different image or executable icon source.
Button icon size. Controls how large the icon appears in the hotspot button.
Tooltip text. Sets the text displayed when the pointer rests over the button.
Also display this text in the button itself. Shows the tooltip/label directly on the button, not just as a tooltip.
Automatic button width and height. Leaving width and height set to Auto lets NextSTART resize the button to fit the icon and label.
Button width and height sliders. Manually sets the width and height of the desktop hotspot button when Auto sizing is not desired.
Always keep above other windows. Keeps the hotspot button visible above normal windows.
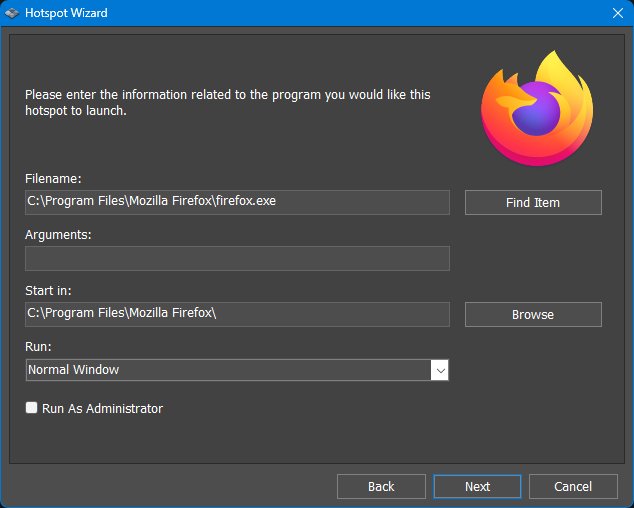
Hotspot Wizard - program action nshotspotwizardprogram.jpg
Filename. Specifies the executable, document, shortcut, or other file launched by the hotspot. Find Item helps locate the target.
Arguments. Optional command-line arguments passed to the program.
Start in. Specifies the working folder used when the program starts. Browse can be used to select it.
Run. Selects the initial window state, such as Normal Window.
Run As Administrator. Launches the program elevated. This should be used only when necessary because elevated programs run with higher privileges.
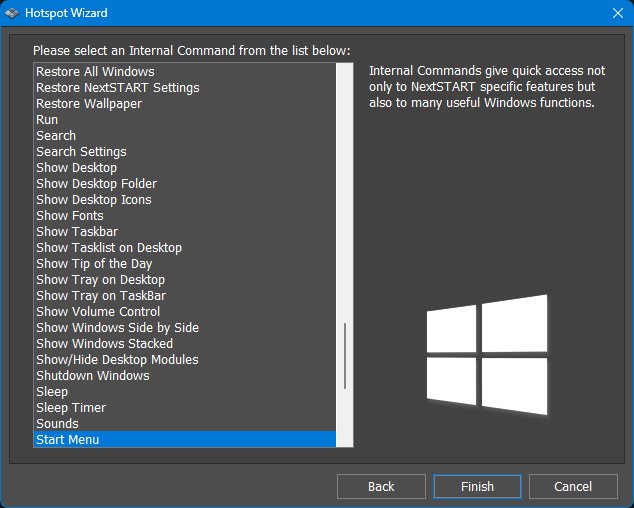
Internal Command list. Selects one of NextSTART's internal commands. Internal Commands provide quick access to NextSTART features and useful Windows actions such as Show Desktop, Restore All Windows, Search, Sleep, Shutdown Windows, Show Taskbar, Show Tray on Desktop, or Show/Hide Desktop Modules.
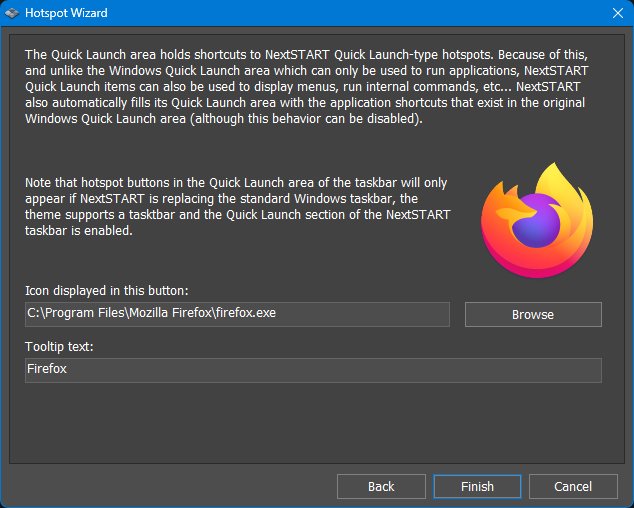
Quick Launch hotspot items. A NextSTART Quick Launch item is a hotspot, not merely an application shortcut. It can display menus, run programs, execute internal commands, or perform other hotspot actions.
Quick Launch requirements. Quick Launch hotspot buttons appear only when NextSTART is replacing the Windows taskbar, the current theme supports a taskbar, and the Quick Launch section is enabled.
Quick Launch icon. Selects the icon shown in the Quick Launch button.
Quick Launch tooltip text. Sets the tooltip displayed for the Quick Launch item.
8. Themes
8.1 Themes tab
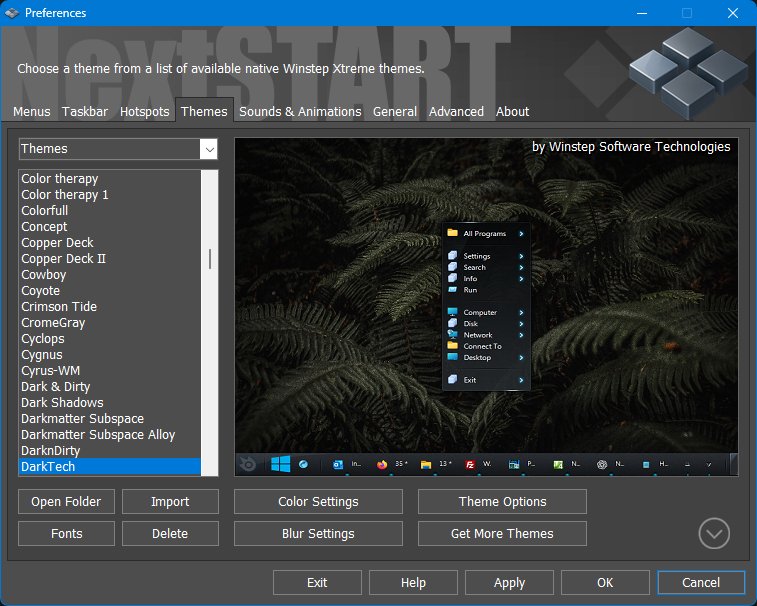
Themes tab nsthemes.jpg
The Themes tab manages NextSTART themes. Themes can skin menus, the taskbar, task buttons, Quick Launch buttons, system tray area, titlebars, sounds, fonts, and other visual resources. Under Winstep Xtreme, themes can also interact with WorkShelf themes.
Theme list and preview. Shows available themes and a preview of the selected theme.
Apply / Preview. Applies or previews the selected theme.
Import / Export / Delete / Save. Manage theme packages and user-created themes where available.
8.2 Fonts
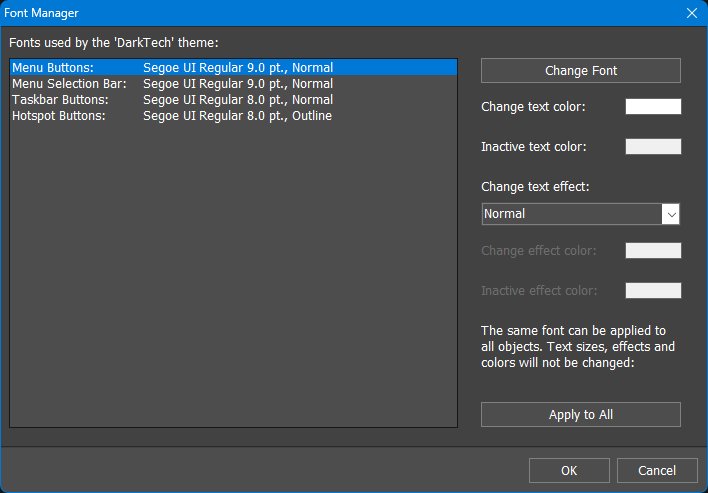
Fonts settings nsfonts.jpg
The Fonts dialog controls the fonts used by menus, taskbar elements, task buttons, and other themed objects where the current theme allows font customization.
8.3 Colorization
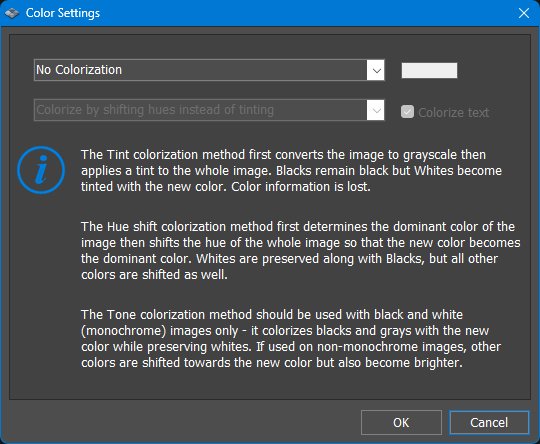
Colorization settings nscolorization.jpg
Colorization lets a theme be recolored without replacing every bitmap. Depending on the selected method, NextSTART can tint, shift hues, or tone monochrome resources. This helps adapt a theme to a wallpaper, accent color, or personal color preference.
8.4 Blur Settings
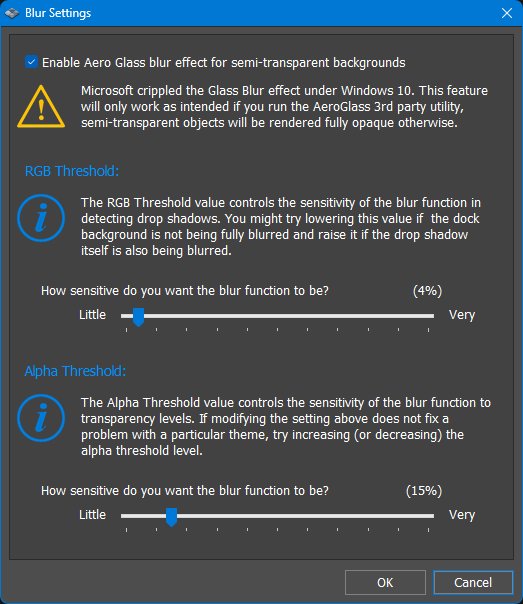
Blur Settings nsblursettings.jpg
Blur settings control translucent/blurred menu and taskbar surfaces where supported. Blur can improve readability over busy backgrounds while preserving a modern translucent look.
8.5 Theme Options
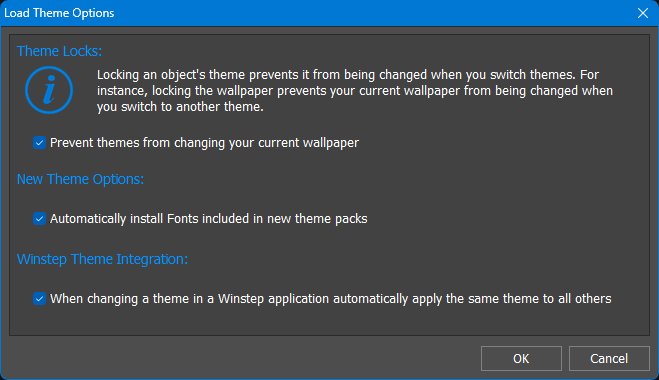
Theme Options nsthemeoptions.jpg
Theme Options controls how themes interact with the desktop, wallpaper, sounds, animations, fonts, WorkShelf, and locked objects. Use these options when you want to apply only part of a theme or prevent a theme from overriding a specific aspect of the current setup.
9. Sounds and Animations
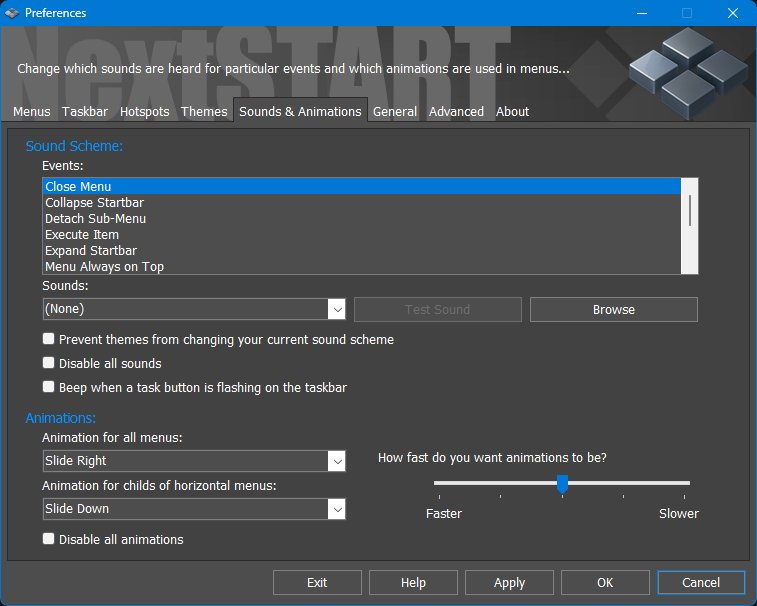
Sounds and animations tab nssoundandanimations.jpg
The Sounds & Animations tab controls the sounds and animations used by menus, taskbar actions, tasklist events, and other NextSTART operations.
Sound events. Assign sounds to menu opening/closing, item execution, roll-up, always-on-top changes, taskbar expansion/collapse, and related events.
Animation effects. Controls how menus open and close, such as sliding, exploding, or other theme-supported animations.
Animation speed. Adjusts how quickly animations play.
Disable Tasklist Beeping. Prevents tasklist attention beeps when a window flashes and requests attention.
Lock Sounds / Lock Animations. Prevents theme changes from replacing the user's chosen sound or animation settings.
10. General
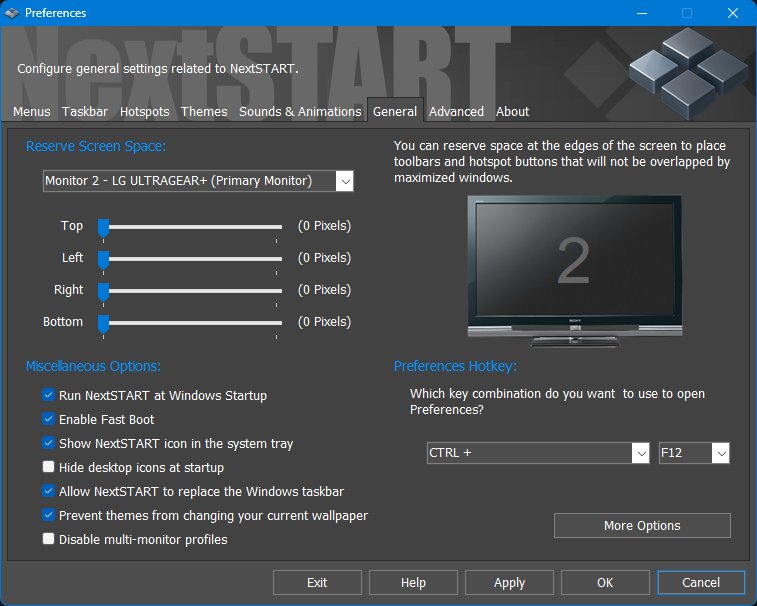
General tab nsgeneral.jpg
The General tab contains global NextSTART options that do not belong specifically to menus, hotspots, themes, sounds, or the taskbar. It also controls reserved screen space, startup behavior, desktop icon behavior, taskbar replacement, multi-monitor profiles, and the hotkey used to open Preferences.
Reserve Screen Space monitor selector. Selects which monitor the reserved-space sliders apply to. Reserved space is configured per monitor, so a multi-monitor setup can reserve different screen edges on different displays.
Top / Left / Right / Bottom reserved space. Reserves a fixed number of pixels at the selected screen edge. Maximized windows will not overlap this reserved area, which is useful for desktop buttons, toolbars, floating tasklists, or other objects placed near an edge.
Run NextSTART at Windows Startup. Starts NextSTART automatically when Windows starts so menus, hotspots, and the NextSTART taskbar are available without launching the program manually.
Enable Fast Boot. Allows NextSTART to become available earlier during Windows startup, reducing the delay normally imposed on startup programs.
Show NextSTART icon in the system tray. Displays the NextSTART tray icon, giving quick access to Preferences and other NextSTART commands from the notification area.
Hide desktop icons at startup. Hides standard Windows desktop icons when NextSTART starts. This is useful for users who prefer a clean desktop controlled by menus, hotspots, docks, and other Winstep objects.
Allow NextSTART to replace the Windows taskbar. Allows NextSTART to take over taskbar duties instead of leaving the standard Windows taskbar as the main taskbar. Disable this if the user wants to keep the Windows taskbar and use NextSTART only for menus/hotspots or supplemental task management.
Prevent themes from changing your current wallpaper. Stops themes from replacing the current desktop wallpaper when a theme is applied.
Disable multi-monitor profiles. Prevents NextSTART from automatically saving and restoring different layouts for different monitor configurations. Leave this disabled if you want NextSTART to remember separate setups for laptop-only, docked, and multi-monitor arrangements.
Preferences Hotkey. Assigns a keyboard shortcut used to open NextSTART Preferences. The two fields select the modifier key combination and the main key, such as CTRL + F12.
More Options. Opens additional global settings, including middle-click emulation, splash screen, Windows visual-style compatibility, high-DPI scaling overrides, and Capture Desktop settings.
10.1 General More Options
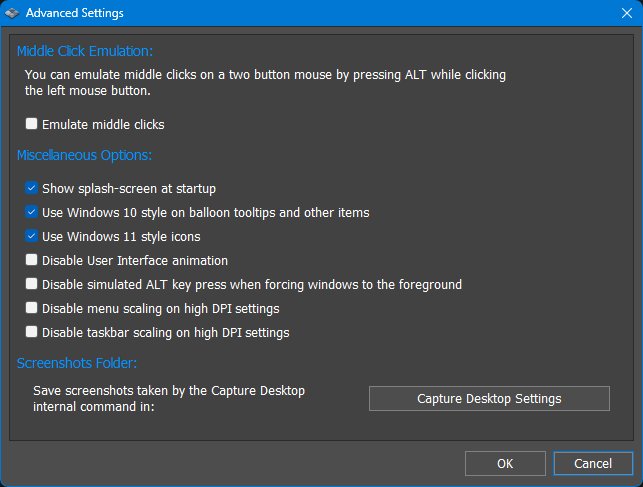
General More Options nsgeneralmoreoptions.jpg
The More Options dialog contains additional global compatibility and convenience settings.
Emulate middle clicks. Lets users with a two-button mouse emulate a middle mouse click by holding ALT while clicking the left mouse button. This is useful because several Winstep objects use middle-click as an alternate launch or action method.
Show splash-screen at startup. Displays the NextSTART splash screen while the application is starting.
Use Windows 10 style on balloon tooltips and other items. Uses Windows 10-style visual elements for supported tooltips and related UI items.
Use Windows 11 style icons. Uses Windows 11-style icons where NextSTART provides or supports them.
Disable User Interface animation. Turns off animations in NextSTART configuration dialogs and related UI areas. This can make the interface feel more immediate and may help on slower systems or remote sessions.
Disable simulated ALT key press when forcing windows to the foreground. Prevents NextSTART from using the Windows ALT-key foreground activation workaround when bringing windows forward. Enable this only if that workaround causes unwanted side effects.
Disable menu scaling on high DPI settings. Prevents menus from being scaled for high-DPI displays. This can preserve the original size of older themes, but may make menus smaller on high-DPI monitors.
Disable taskbar scaling on high DPI settings. Prevents the NextSTART taskbar from being scaled for high-DPI displays. This can be useful for older themes or users who prefer the original pixel size.
Screenshots Folder. Defines where screenshots created by the Capture Desktop internal command are saved.
Capture Desktop Settings. Opens the settings for the Capture Desktop internal command, including screenshot file format, location, and related capture options.
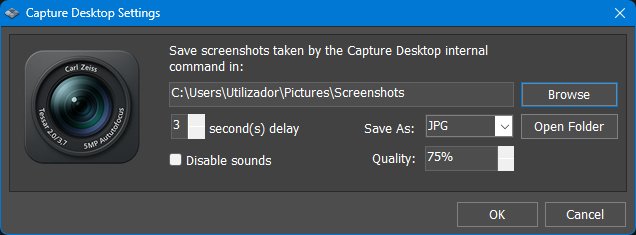
Capture Desktop
Capture Desktop settings nscapturedesktop.jpg
The Capture Desktop internal command saves screenshots from a menu, hotspot, Quick Launch item, taskbar button, or other compatible NextSTART activation method. Its settings control where screenshots are saved, the output format, quality, countdown delay, and sound feedback.
Screenshot folder. Selects the folder where Capture Desktop saves screenshots. Browse selects a folder and Open Folder opens the current destination.
Screenshot format. Selects the image format used for captured screenshots.
Screenshot quality. Controls output quality for formats where this applies.
Delay. Adds a countdown delay before taking the screenshot.
Disable sounds. Turns off Capture Desktop sound feedback.
11. Advanced
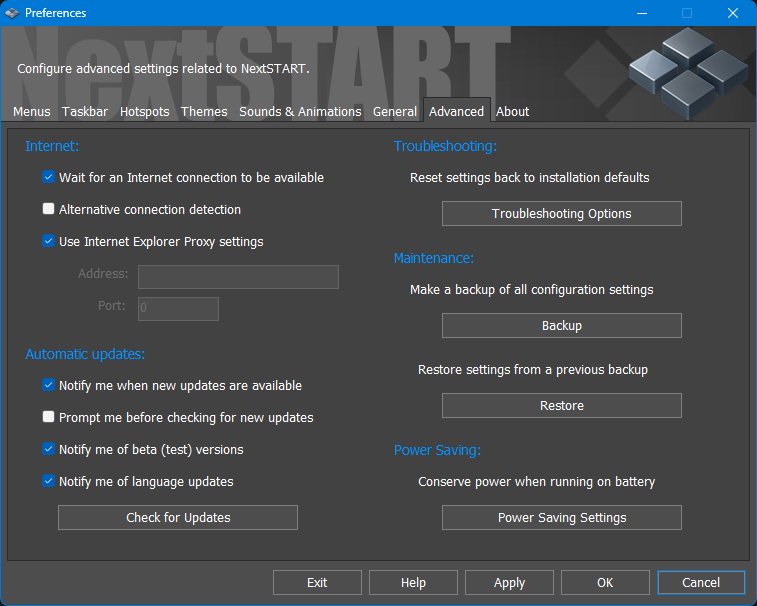
Advanced tab nsadvanced.jpg
The Advanced tab contains Internet/update behavior, backup and restore actions, troubleshooting access, and power-saving configuration.
Wait for an Internet connection to be available. Delays update checks and other Internet-dependent actions until a connection is detected. This helps avoid false failures during Windows startup, before networking is ready.
Alternative connection detection. Uses an alternate method to detect Internet availability. Enable this if normal connection detection is unreliable on the user's network or system configuration.
Use Internet Explorer Proxy settings. Uses the Windows/Internet Explorer proxy configuration for NextSTART Internet access. This is useful on networks where Internet access must go through a configured proxy.
Proxy Address and Port. When manual proxy details are available, these fields specify the proxy server address and port used for Internet access. They are disabled when the selected proxy mode does not require manual entry.
Notify me when new updates are available. Allows NextSTART/Winstep Update Manager to notify the user when a newer release is available.
Prompt me before checking for new updates. Asks for confirmation before performing an update check, instead of checking silently according to the configured update behavior.
Notify me of beta (test) versions. Includes beta/test builds in update notifications. Disable this if the user only wants stable public releases.
Notify me of language updates. Notifies the user when updated language files or translations are available.
Check for Updates. Starts a manual update check immediately.
Troubleshooting Options. Opens the recovery and diagnostic tools dialog used to repair file associations, reset tray cache data, test service communication, and reset settings if necessary.
Backup. Creates a backup of all NextSTART configuration settings. Users should create a backup before major theme, menu, hotspot, or taskbar changes.
Restore. Restores settings from a previous backup. This is useful for recovering from accidental menu deletion, theme changes, or other configuration mistakes.
Power Saving Settings. Opens the dialog that controls manual and automatic power-saving behavior.
11.1 Power Saving Settings
Power Saving Settings nspowersaving.jpg
Power Saving Settings control when NextSTART and related Winstep components reduce activity to conserve power. When power saving is active, some features are disabled or behave differently, and update/polling rates are reduced.
Power saving mode is currently. Manually selects the current power-saving state. Off uses normal behavior. Normal reduces activity while preserving most visual feedback. Ultra applies stronger reductions and disables more non-essential animations/effects.
Turn on automatically based on. Selects the condition that automatically activates power saving. The screenshot shows Never; other choices may enable power saving when running on battery or under related power conditions.
Activate on monitor standby. Activates power saving when the monitor enters standby. This reduces background activity while the display is asleep.
Activate on full screen application. Activates power saving while a full-screen application is running. This is especially useful for games and video playback because dock/taskbar activation is avoided and non-essential updates are reduced.
Power Saving Mode internal command. The same power-saving state can be toggled manually from menus, hotspots, Quick Launch items, or other objects by using the Power Saving Mode internal command.
11.2 Troubleshooting Options
Troubleshooting Options nstroubleshooting.jpg
The Troubleshooting Options dialog provides repair and recovery tools for unusual behavior, corrupted caches, broken associations, or configuration mistakes. The reset operations are intentionally separated by scope so the user can choose the least destructive repair first.
Restore File Associations. Restores file associations used by NextSTART/Winstep where applicable. Use this if associated files or theme/configuration files no longer open correctly.
Check Service Communication. Tests communication with the Winstep service or helper component used for operations that require service assistance.
Reset Tray Cache. Clears cached system tray information. This can help when tray icons are wrong, stale, duplicated, or missing after Windows or application changes.
Backup. Creates a backup of the current settings before performing irreversible reset actions. The dialog explicitly warns the user to back up first.
Reset Settings Only. Resets application settings while leaving menus and hotspots intact. This is the least destructive reset option.
Reset Menus and Hotspots. Resets menu and hotspot configuration. Use this if menus or hotspots have become unusable, but be aware that customized menu/hotspot layouts may be lost.
Reset Everything. Resets NextSTART back to the default installed configuration. This is the most destructive option and should only be used after creating a backup.
12. About
About tab nsabout.jpg
The About tab is the final Preferences tab. It shows version, registration, language, support, update, data-folder, and user-interface color information.
Language. Selects the user-interface language used by NextSTART.
User Interface style. Selects the Preferences/interface style, such as dark gray, light, standard, or Winstep-style modes depending on the available choices.
Version. Shows the installed NextSTART version. Clicking the version link opens detailed version information.
Check for Updates. Opens the update checker to look for newer releases.
Open Data Folder. Opens the folder that contains NextSTART/Winstep data and configuration files.
Colorize User Interface. Adjusts the red, green, and blue tint values used to colorize the Preferences interface.
Support Address and Web Site. Shows the Winstep support email address and web site link.
Registration and upgrade status. Displays the registered user name and the date until which the current license key is valid for upgrades.
Version Information dialog nsversions.jpg
Change Log dialog nschangelog.jpg
Version Information / Change Log. Shows detailed version/build information and the list of changes in the installed version and recent releases.
13. Internal Commands
Internal Commands are special Winstep actions that can be added as shortcuts to NextSTART menus, hotspots, Quick Launch buttons, the NextSTART taskbar, docks, shelves, and other Winstep objects. They are normally organized into command groups such as application, desktop, media, disc, miscellaneous, system, and shutdown commands.
To add an internal command to a menu or compatible object, right-click the object, choose the appropriate insert command, and select Internal Command. Hotspots can also be assigned directly to internal commands through the Hotspot Wizard.
13.1 Command groups
Group
Examples
Application
NextSTART Help, NextSTART Preferences, Exit NextSTART, Check for Updates, Version Info.
Desktop
Show Desktop, Minimize All Windows, Restore All Windows, Hide/Show Desktop Icons, Show Desktop Folder.
Media
Media Play, Media Pause, Media Stop, Media Next, Media Previous, Media Volume Up/Down, Media Player.
Disc
CD Control and drive eject/close commands where supported.
System
Control Panel, Windows Settings, Task Manager, Power Options, Language Bar, Lookup IP Address.
The full command list is long, but several commands deserve special attention because they provide substantial built-in functionality.
Alarm Manager. Opens the Winstep Alarm Manager, a reminder and task scheduler capable of popup reminders, audio playback, recurring alarms, and running applications or internal commands on a schedule.
Since Alarms are controled by WorkShelf, WorkShelf must
be running.
Auto-Backup Settings. Creates a backup in the Backups folder using a unique automatically generated name. It does not open a settings dialog. It is especially useful with Alarm Manager: a scheduled alarm can run this command monthly or on another schedule to create recurring backups. If
WorkShelf is running, it also instructs WorkShelf to back up its settings.
Capture Desktop. Saves a desktop screenshot as JPG or PNG. Its settings can define file format, compression, save location, countdown delay, and sounds. Holding Alt while activating the icon captures the foreground window.
Fast Boot. Toggles the option that makes Winstep applications available earlier during Windows startup, reducing the delay Windows can impose on startup applications.
Language Bar. Provides a Winstep language/input indicator and switcher for keyboard layouts and input languages.
Lookup IP Address. Shows the external IP address and Geo IP location information.
Media Control. Provides individual commands for play, pause, stop, next, previous, mute, and volume control.
Media Player. Runs Winstep's built-in media player and uses the playlists shared with Alarm Manager.
Power Saving Mode. Toggles Winstep power saving between Off, Normal, and Ultra. It can also be triggered automatically by battery state, Battery Saver, screen standby, or full-screen applications.
Sleep Timer. Opens the full-screen sleep timer alarm, useful for falling asleep with music while volume and brightness gradually decrease.
13.3 Complete command list
Command
Action
Action Center
Opens the Windows Action Center panel.
Accounts
Opens the Windows Accounts dialog.
Activate All
Activates all Winstep Xtreme objects and brings them to the foreground.
Add New Hardware
Opens Device Manager.
Add New Printer
Opens the Windows Add Printer dialog.
Add-Remove Programs
Opens Programs and Features.
Alarm Manager
Opens the Winstep Alarm Manager.
Apps
Opens the Windows Apps settings page.
Auto-Backup Settings
Creates a backup of all Winstep application settings using an automatically generated file name.
Backup NextSTART Settings
Backs up the NextSTART settings.
Bring NextSTART Forward
Brings NextSTART objects to the foreground.
Bring WorkShelf Forward
Brings WorkShelf objects to the foreground.
CD Control
Shows inserted media type and opens or closes the selected optical drive drawer where supported.
Capture Desktop
Saves a screenshot of the desktop as a JPG or PNG file.
Cascade Windows
Cascades all windows.
Check for Updates
Checks for newer Winstep versions.
Clear Recent Documents
Clears the Recent Documents list.
Control Panel
Opens Control Panel.
Date & Time Properties
Opens the Date and Time dialog.
Devices
Opens the Windows Devices settings page.
Display Properties
Opens Display settings or Personalization.
Ease of Access
Opens the Windows Ease of Access settings page.
Empty Recycle Bin
Empties the Recycle Bin.
Exit NextSTART
Exits NextSTART after confirmation.
Exit Winstep Xtreme
Exits Winstep Xtreme applications after confirmation.
Fast Boot
Toggles Fast Boot startup behavior.
Game Controllers
Opens Game Controllers.
Gaming
Opens the Windows Gaming settings page.
Hibernate
Hibernates the computer.
Hide All
Hides Winstep objects and collapses or fades visible desktop objects.
Hide Desktop Icons
Hides desktop icons.
Hide Taskbar
Hides the Windows taskbar.
Hide/Show Desktop Icons
Toggles desktop icons.
Hide/Show Taskbar
Toggles the Windows taskbar.
Internet Options
Opens Internet Properties.
Keyboard
Opens Keyboard properties.
Language Bar
Displays and switches the current input language and keyboard layout.
Lock Computer
Locks the computer.
Log Off
Logs off after confirmation.
Lookup IP Address
Shows the public IP address and Geo IP location information.
Media Mute
Mutes or unmutes audio.
Media Next
Skips to the next track.
Media Pause
Pauses media playback.
Media Play
Starts media playback.
Media Player
Runs the built-in Winstep Media Player.
Media Previous
Skips to the previous track.
Media Stop
Stops media playback.
Media Volume Down
Lowers media volume.
Media Volume Up
Raises media volume.
Minimize All Windows
Minimizes all open windows.
More Themes
Opens the Winstep themes page.
Mouse Properties
Opens Mouse properties.
My Computer
Opens This PC / My Computer.
Network & Internet
Opens Network & Internet settings.
Network Properties
Opens Network Connections.
Peek Desktop
Uses Aero Peek where supported.
Personalization
Opens Windows Personalization.
Power Management
Opens Power Options.
Power Off Monitor
Powers off all monitors.
Power Saving Mode
Toggles Winstep power saving mode between Off, Normal and Ultra.
Printers
Opens Printers.
Privacy
Opens Windows Privacy settings.
Quick Exit NextSTART
Exits NextSTART without confirmation.
Quick Exit Winstep Xtreme
Exits Winstep Xtreme without confirmation.
Quick Log Off
Logs off without confirmation.
Quick Restart Windows
Restarts Windows without confirmation.
Quick Shutdown Windows
Shuts down Windows without confirmation.
Recycle Bin
Opens the Recycle Bin.
Regional Settings
Opens Regional settings.
Restart NextSTART
Restarts NextSTART without confirmation.
Restart Windows
Restarts Windows after confirmation.
Reset Reserved Screen Space
Resets reserved screen-space areas at screen edges.
Restore All Windows
Restores minimized windows.
Restore NextSTART Settings
Restores NextSTART settings from a backup.
Restore Wallpaper
Restores the wallpaper used before a Winstep theme changed it.
Run
Opens the Windows Run dialog.
Search
Opens Windows Search.
Search Settings
Opens Windows Search settings.
Show Desktop
Hides open windows, equivalent to WIN+D.
Show Desktop Folder
Opens the Desktop folder.
Show Desktop Icons
Shows desktop icons.
Show Fonts
Opens the Fonts folder.
Show Taskbar
Shows the Windows taskbar.
Show Tip of the Day
Shows the Tip of the Day dialog.
Show Volume Control
Opens the Windows Volume Mixer.
Show Windows Side by Side
Arranges windows side by side.
Show Windows Stacked
Stacks open windows.
Show/Hide Desktop Modules
Toggles WorkShelf desktop modules.
Shutdown Windows
Shuts down the computer after confirmation.
Sleep
Puts the computer to sleep.
Sleep Timer
Opens the full-screen sleep timer alarm.
Sounds
Opens Windows Sound settings.
Start Menu
Opens the Windows Start Menu.
Start Screen-Saver
Starts the screen saver.
System
Opens the Windows System/About page.
System Properties
Opens System Properties.
Task Manager
Opens Windows Task Manager.
Task View
Opens the Windows virtual desktop/task view interface.
Time & Language
Opens Windows Time & Language settings.
Version Info
Opens version information for the application.
Windows Help
Opens Windows Help.
Windows Settings
Opens Windows Settings.
Windows Update
Opens Windows Update.
NextSTART Help
Opens the NextSTART help file.
NextSTART Preferences
Opens NextSTART Preferences.
14. Questions and Support
For help, updates, themes, and support, use the links in the About tab or visit the Winstep web site and forums. When reporting a problem, include the product name, version, build number, Windows version, monitor configuration, and a clear description of what happened.
Because NextSTART is highly configurable, screenshots of the relevant Preferences page, hotspot, menu, taskbar section, or tasklist setting can make support requests much easier to understand.